Kowabunga is an SD-WAN and HCI (Hyper-Converged Infrastructure) Orchestration Engine.
Market BS aside, Kowabunga provides DevOps with a complete infrastructure automation suite to orchestrate virtual resources management automation on privately-owned commodity hardware.
On-Premises mastered and predictable flat-rate hardware.
1 - Overview
How can Kowabunga sustain your applications hosting ?
What is it ?
Kowabunga is an SD-WAN and HCI (Hyper-Converged Infrastructure) Orchestration Engine.
Market BS aside, Kowabunga provides DevOps with a complete infrastructure automation suite to orchestrate virtual resources management automation on privately-owned commodity hardware.
On-Premises mastered and predictable flat-rate hardware.
The Problem
Cloud Services are unnecessarily expensive and come with vendor-locking.
“Cloud computing is basically renting computers, instead of owning and operating your own server hardware. From the start, companies that offer cloud services have promised simplicity and cost savings. Basecamp has had one foot in the cloud for well over a decade, and HEY has been running there exclusively since it was launched two years ago. We’ve run extensively in both Amazon’s cloud and Google’s cloud, but the savings promised in reduced complexity never materialized. So we’ve left.
The rough math goes like this: We spent $3.2m on cloud in 2022. The cost of rack space and new hardware is a total of $840,000 per year.
Leaving the cloud will save us $7 million over five years.
At a time when so many companies are looking to cut expenses, saving millions through hosting expenses sounds like a better first move than the rounds of layoffs that keep coming.”
Cost-Effective: Full private-cloud on-premises readiness and ability to run on commodity hardware. No runtime fees, no egress charges, flat-rate predictable cost. Keep control of your TCO.
Resilient & Features-Rich: Kowabunga enables highly-available designs, across multiple data centers and availability zones and brings automated software-as-a-service. Shorten application development and setup times.
No Vendor-Locking: Harness the potential of Open-Source software stack as a backend: no third-party commercial dependency. We stand on the shoulders of giants: KVM, Ceph … Technical choices remain yours and yours only.
Open Source … by nature: Kowabunga itself is OpenSource, from API to client and server-side components. We have nothing to hide but everything to contribute. We believe in mutual trust.
A Kowabunga-hosted project costs 1/10th of a Cloud-hosted one.
Why do I want it ?
What is it good for?: Modern SaaS products success are tightly coupled with profitability. As soon as you scale up, you’ll quickly understand that you’re actually sponsoring your Cloud provider more than your own teams. Kowabunga allows you to keep control of your infrastructure and its associated cost and lifecycle. You’ll never get afraid of unexpected business model change, tariffs and whatnot. You own your stack, with no surprises.
What is it not good for?: PoC and MVP startups. Let’s be realistic, if you’re goal is to vibe-code your next million-dollar idea and deliver it, no matter how and what, forget about us. You have other fish to fry than mastering your own infrastructure. Get funded, wait for your investors to ask for RoI, and you’ll make your mind.
What is it not yet good for?: Competing with GAFAM. Let’s be honest, we’ll never be the next AWS or GCP (or even OpenStack). We’ll never have 200+ as-a-service kind of stuff, but how many people actually need that much ?
Is it business-ready ?
Simply put … YES !
Kowabunga allows you to host and manage personal labs, SOHO sandboxes, as well as million-users SaaS projects. Using Open Source software doesn’t imply living on your own. Through our sponsoring program, Kowabunga comes with 24x7 enterprise-grade level of support.
Fun Facts 🍿
Where does it comes from ? Everything comes as a solution to a given problem.
Our problem was (and still is …) that Cloud services are unnecessarily expensive and often come with vendor-locking.
While Cloud services are appealing at first and great to bootstrap your project to an MVP level, you’ll quickly hit profitability issues when scaling up.
Provided you have the right IT and DevOps skills in-house, self-managing your own infrastructure makes sense at economical level.
Linux and QEMU/KVM comes in handy, especially when powered by libvirt but we lacked true resource orchestration to push it to next stage.
OpenStack was too big, heavy, and costly to maintain. We needed something lighter, simpler.
So we came with Kowabunga: Kvm Orchestrator With ABUNch of Goods Added.
Where should I go next ?
Concepts: Lear about Kowabunga architecture and design
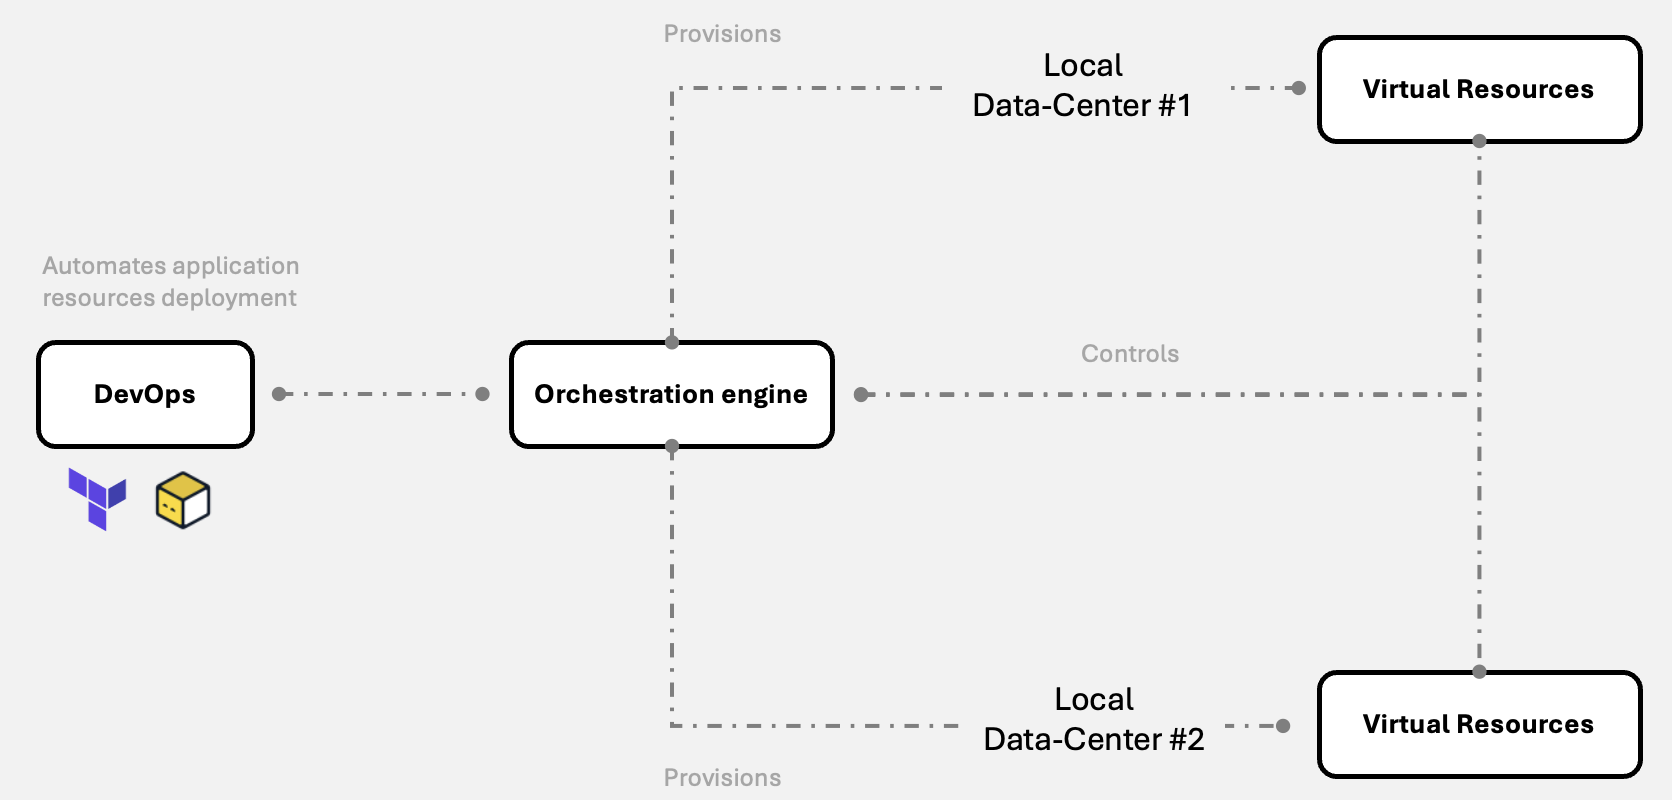
Simply put, Kowabunga allows you to control and manage low-level infrastructure at your local on-premises data-centers and spin up various virtual resources on top, as to leverage your applications on top.
Local data centers consist of a bunch of physical machines (can range from personal computers, commodity hardware to high-end enterprise-grade servers) providing raw networking, computing and storage resources. Physical assests plainly sit in your basement. They don’t need to be connected to other data-centers, they don’t even need to know about others data-centers’ existence and more than anything, they don’t need to be exposed to public Internet.
From an IT and assets management’s perspective, one simply needs to ensure they run and, capacity planning in mind, that they do offer enough physical resources to sustain future applications hosting needs.
On each data-center, some physical machines (usually lightweight) will be dedicated to providing networking kind of services, through Kowabunga’s Kiwi agents, while others will providing computing and storage capabilities, thanks to Kowabunga’s Kaktus agents.
The Kowabunga project then come with Kahuna, its orchestration engine. This is the masterpiece cornerstone of your architecture. Kahuna act as a maestro, providing API servicess for admins and end-users, and provising and controlling virtual resources on the various data-centers through Kowabunga connected agents.
Ultimately, DevOps consumers will only ever interface with Kahuna.
So, how does magic happen ?
Kahuna has a triple role exposure:
Public REST API: implements and operates the API calls to manage resources, DevOps-orchestrated, manually (not recommended) or through automation tools such as Terraform, OpenTofu or Ansible.
Public WebSocket endoint: agent connection manager, where the various Kowabunga agents (from managed data-centers) establish secure WebSocket tunnels to, for being further controlled, bypassing on-premises firewall constraints and preventing the need of any public service exposure.
Metadata endpoint: where managed virtual instances and services can retrieve information services and self-configure themselves.
Core Components
So, let’s rewind, the Kowabunga projects consists of multiple core components:
Kahuna: the core orchestration system. Remotely controls every resource and maintains ecosystem consistent. Gateway to the Kowabunga REST API.
Kaktus: the HCI node(s). Provides KVM-based virtual computing hypervisor with Ceph-based distributed storage services.
Kiwi: the SD-WAN node(s). Provides various network services like routing, firewall, DHCP, DNS, VPN, peering (with active-passive failover).
Koala: the WebUI. Allows for day-to-day supervision and operation of the various projects and services.
Aside from these, Kowabunga introduces the concept of:
Region: basically a physical location, which can be assimilated to a data-center.
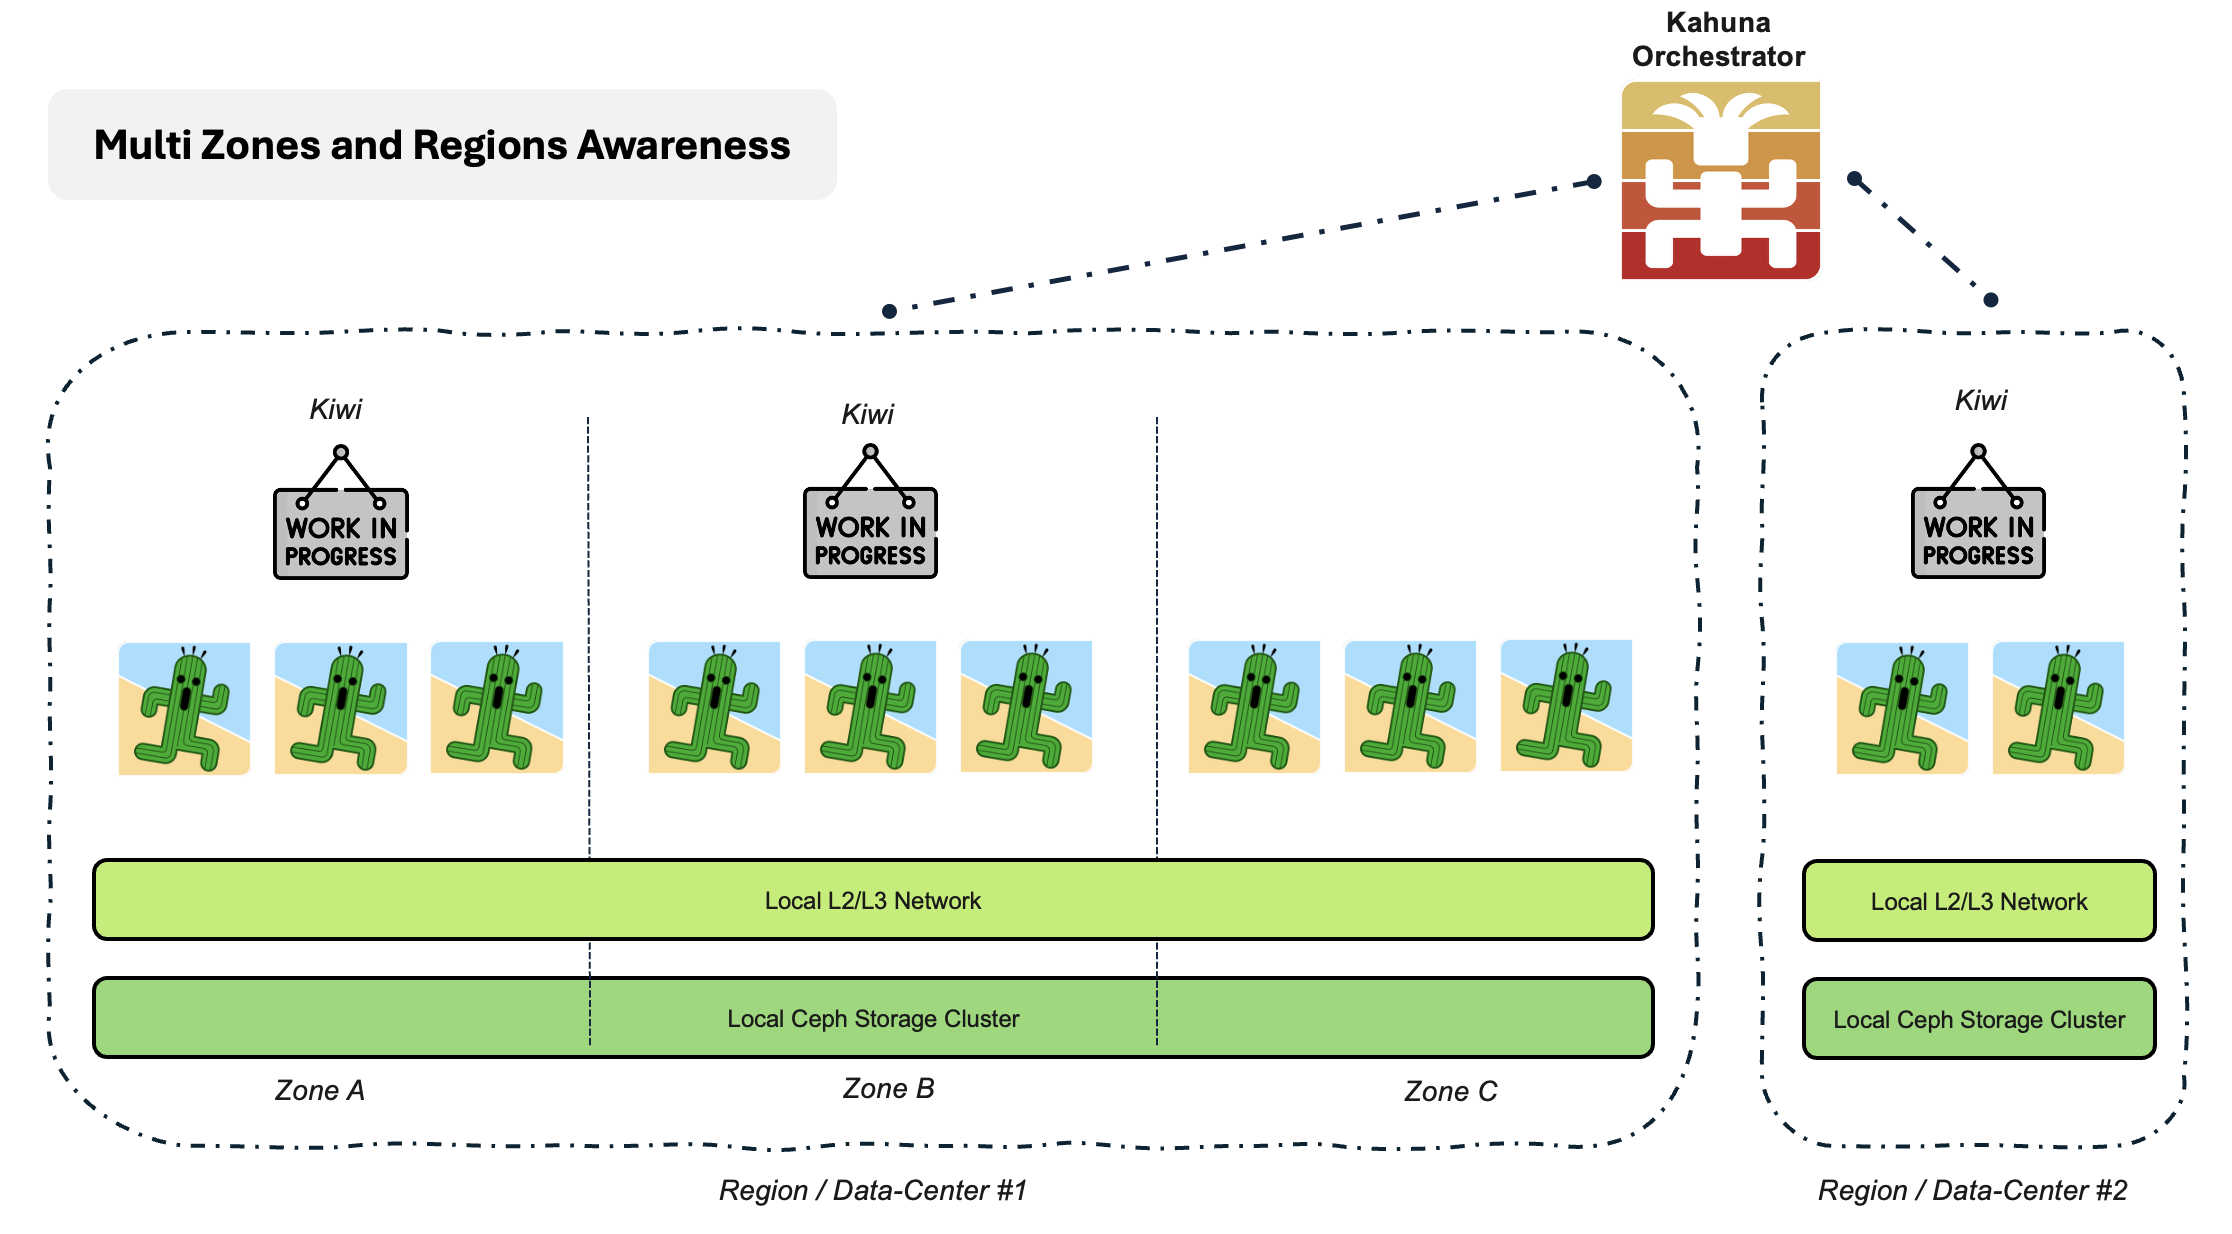
Zone: a specific subset of a region, where all underlying resources are guaranteed to be self-autonomous (in terms of Internet connectivity, power-supply, cooling …). As with other Cloud providers, the zones allow for application workload distribution within a single region, offering resilience and high-availability.
Warning
While Zones are part of the same Region, they are recommended to be geographically isolated (5 to 30km for example), yet inter-connected through a sub-millisecond latency.
Regardless of their respective Zone, all physical instances from a given Region must share the same L2/L3 physical network backbone (black fiber) to provide efficient distributed storage performances.
Topology Uses Cases
This illustrates what a Kowabunga Multi-Zones and Regions topology would looks like:
On the left side, one would have a multi-zones region. Divided into 3 Zones (i.e. 3 physically isolated data-centers, physically inter-connected by a network link), the region features 11 servers instances:
3x3 Kaktus instances, providing computing and storage capabilities.
Zones can be pictured in different ways:
several floors from your personal home basement (ok … useless … but for the sake of example).
several IT rooms from your company’s office.
several buildings from your company’s office.
Should a Kowabunga user request for a virtual machine creation in this dedicated region, he could specifically request it to be assigned to one of the 3 zones (the underlying hypervisor from each zone will be automatically picked), or request some -as-a-service feature, which would be seamlessly spawned in multiple zones, as to provide service redundancy.
Sharing the same L2/L3 network across the same region, disk instances will be distributed and replicating across zones, allowing for fast instance relocation in the event of one zone’s failure.
On the right side, one would have a single-zone region, with just a couple of physical instances.
Tips
Bear in mind that regions are autonomous. They can blindly co-exist, with different underlying capabilities and level of services.
One could imagine having a specific region dedicated for staging and one for production workloads (to keep resources isolated from each environment) or even multiple regions, each being specific to a given company or customer.
What Makes it Different ?
Cloud providers aside, what makes Kowabunga different from other on-premises infrastructure and virtualization providers (such as VMware, Nutanix, OpenStack …).
Well … 0 licensing costs. Kowabunga is Open Source with no paywalled features. There’s no per-CPU or per-GB or memory kind of license. Whether you’d like to set your private small-sized copamy’s data-center with 3 servers or full fleet of 200+, your cost of operation will remain flat.
But aside from cost, Kowabunga has been developed by and for DevOps, the ones who:
need to orchestrate, deploy and maintain heterogenous applications on heterogenous infrastructures.
use Infrastructure-as-Code principles to ensure reliability, durability and traceability.
bear security in mind, ensuring than nothing more than what’s required must be publicly exposed.
believe than smaller and simpler is better.
Tips for Managed Services Provider
If you’re acting as a Managed Services Provider (MSP) having to sustain various applications for dozens if not hundreds of customers, Kowabunga might come in handy.
Simply picture your various customer on-premises data-centers as Kowabunga regions. All autonomous, un-aware of each others, non-exposed to Internet (hello IT !), yet fully remotely manageable in a single unique way, thanks to Kahuna’s orchestration !
2.1 - Kahuna Orchestrator
Learn about Kahuna orchestrator.
Kahuna is Kowabunga’s orchestration system. Its name takes root from Hawaiian’s (Big) Kahuna word, meaning “the expert, the most dominant thing”.
Kahuna remotely controls every resource and maintains ecosystem consistent. It’s the gateway to Kowabunga REST API.
From a technological stack perspective, Kahuna features:
a Caddy public HTTPS frontend, reverse-proxying requests to:
Public REST API handler: implements and operates the API calls to manage resources,interacting with rightful local agents through JSON-RPC over WSS.
Public WebSocket handler: agent connection manager, where the various agents establish secure WebSocket tunnels to, for being further controlled, bypassing on-premises firewall constraints and preventing the need of any public service exposure.
Metadata endpoint: where managed virtual instances and services can retrieve information services and self-configure themselves.
Kowabunga API folds into 2 type of assets:
admin ones, used to handle objects like region, zone, kaktus and kiwi hosts, agents, networks …
user ones, used to handle objects such as Kompute, Kawaii, Konvey …
Kahuna implements robust RABC and segregation of duty as to ensure access boundaries, such as:
Nominative RBAC capabilities and per-organization and team user management.
Per-project teams associationfor per-resource access control.
Support for both JWT bearer (human-to-server) and API-Key token-based (server-to-server) authentication mechanisms.
Support for 2-steps account creation/validation and enforced robust passwords/tokens usage(server-generated, user-input is prohibited).
Nominative robust HMAC ID+token credentials over secured WebSocket agent connections.
This ensures that:
only rightful designated agents are able to establish WSS connections with Kahuna
created virtual instances can only retrieve the metadata profile they belong to (and self configure or update themselves at boot or runtime).
users can only see and manage resources for the projects they belong to.
Warning
Despite being central, Kahuna’s implementation does not yet allow for stateless distribution.
The current design with DB caches and WebSocket connection makes it hard to distribute without involving a message queue middleware. This is a good problem for the future, but not for now. A single Kahuna instance is perefeclty capable of handling multiple thousands of concurrent connections, which we believe to be more than enough for a private platform orchestrator (it wouldn’t for a large-scale public Cloud one).
Providing Kahuna with high-availability remains however fully possible, using good-old active-passive failover mechanism.
2.2 - Koala WebUI
Learn about Koala Web application.
Koala is Kowabunga’s WebUI. It allows for day-to-day supervision and operation of the various projects and services.
But should you ask a senior DevOps / SRE / IT admin, fully automation-driven, he’d damn anyone who’d have used the Web client to manually create/edit resources and messes around his perfecly maintained CasC.
We’ve all been there !!
That’s why Koala has been designed to be read-only. While using Kowabunga’s API, the project’s directive is to enforce infrastructure and configuration as code, and such, prevents any means to do harm.
Koala is AngularJS based and usually located next to Kahuna’s instance. It provides users with capability to connect, check for the various projects (they belong to) resources, optionnally start/reboot/stop them and/or see various piece of information and … that’s it ;-)
2.3 - Kiwi SD-WAN
Learn about Kiwi SD-WAN node.
Kiwi is Kowabunga SD-WAN node in your local data-center. It provides various network services like routing, firewall, DHCP, DNS, VPN and peering, all with active-passive failover (ideally over multiple zones).
Kiwi is central to our regional infrastructure to operate smoothly and internal gateway to all your projects Kawaii private network instances. It controls the local network configuration and creates/updates VLANs, subnets and DNS entries per API requests.
Kiwi offers a Kowabunga project’s network isolation feature by enabling VLAN-bound, cross-zones, project-attributed, VPC L3 networking range. Created virtual instances and services are bound to VPC by default and never publicly exposed unless requested.
Access to project’s VPC resources is managed either through:
Kiwi-managed region-global VPN tunnels.
Kawaii-managed project-local VPN tunnels.
Decision to do or another depends on private Kowabunga IT policy.
2.4 - Kaktus HCI
Learn about Kaktus HCI node.
Kaktus stands for Kowabunga Amazing KVM and TUrnkey Storage (!!), basically, our Hyper-Converged Infrastructure (HCI) node.
While large virtualization systems such as VMware usually requires you to dedicate servers as computing hypervisors (with plenty of CPU and memory) and associate them with remote, extensive NAS or vSAN, providing storage, Kowabunga follows the opposite approach. Modern hardware is powerful enough to handle both computing and storage.
This approach allows you to:
use commodity hardware, if needed
use heterogenous hardware, each member of the pool featuring more or less computing and storage resources.
If you’re already ordering a heavy computing rackable server, extending it with 4-8 SSDs is always going to be cheaper than adding an extra enterprise SAN.
Kaktus nodes will then consists of
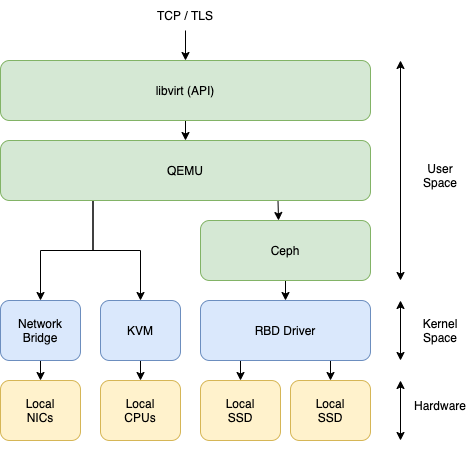
a KVM/QEMU + libvirt virtualization computing stack. Featuring all possible VT-x and VT-d assistance on x86_64 architectures, it’ll provide near passthrough virtualization capabilities.
several local disks, to be part of a region-global Ceph distributed storage cluster.
the Kowabunga Kaktus agent, connected to Kahuna
From a pure low-level software perspective, our virtualization stack relies on 3 stacks:
Linux Network Bridging driver, for virtual interfaces access to host raw network interfaces and physical network.
Linux KVM driver, for CPU VT-X extension support and improved virtualization performances.
RBD (Rados Block Device) driver, for storing virtual block devices under distributed Ceph storage engine.
QEMU drives these different backends to virtualize resources on to.
Now QEMU being a local host process to be spawned, we need some kind of orchestration layer on top of that. Here comes libvirt. libvirt provides an API over TCP/TLS/SSH that wraps virtual machines definition over an XML representation that can be fully created/updated/destroyed remotely, controlling QEMU underneath. Kaktus agent controls the local KVM hypervisor through libvirt backend and the local-network distributed Ceph storage, allowing management of virtual machines and disks.
Note
When configured for production-systems, Ceph storage cluster will be backed by cross-zones N-times (usually 3) replicated high-performance block devices, providing virtually infinitely scalable and resizeable disk volumes with byte-precision.
Virtual disks contents being sharded into thousands of fragmented objects, spread across the various disks from the various Kaktus instances of a given region, the “chance” of data loss or corruption is close to none.
Enterprise Recommendations
If you intend to use Kowabunga to run serious business (and we hope you’ll do), you need to ensure to give Ceph its full potential.
Too many Cloud systems are today limited (CPU stuck in I/O wait) by disk bandwidth. Using Ceph, implies that your disks I/Os are to be adressed through network. Simply put, don’t expect to get NVME SSDs access time.
In order to ensure the fastest storage possible, it remains key that you:
use local NVMe SSDs on as much server instances as possible (they’ll all be part of the same cluster pool).
use physical servers with at 10 Gbps network interfaces (25 Gbps is even better, link-agregation is a nice bonus).
ensure that your regional zones are less than 1ms away from each other.
This may sounds like heavy requirements, but by today enterprise-grade standards, it’s really isn’t anymore ;-)
3 - Getting Started
Deploy your first Kowabunga instance !
3.1 - Hardware Requirements
Prepare hardware for setup
Setting up a Kowabunga platform requires you to provide the following hardware:
1x Kahuna instance (more could used if high-availability is expected).
1x Kiwi instance per-region (2x recommended for production-grade)
1x Kaktus instance per-region (a minimum of 3x recommended for production-grade, can scale to N).
Important
Note that while it should work on any kind of Linux distribution, Kowabunga has only been tested (understand it as supported) with Ubuntu LTS. Kowabunga comes pre-packaged for Ubuntu.
Kahuna Instance
Kahuna is the only instance that will be exposed to end users. It is recommended to have it exposed on public Internet, making it easier for DevOps and users to access to but there’s no strong requirement for that. It is fairly possible to keep it local to your private corporate network, only accessible from on-premises network or through VPN.
Hardware requirements are lightweight:
2-cores vCPUs
4 to 8 GB RAM
64 GB for OS + MongoDB database.
Disk and network performance is fairly insignificant here, anything modern will do just fine.
We personnally use and recommend using small VPS-like public Cloud instances. They come with public IPv4 address and all that one needs for a monthly price of $5 to $20 only.
Kiwi Instance
Kiwi will act as a network software router and gateway. Even more than for Kahuna, you don’t need much horse-power here. If you plan on setting your own home labs, a small 2 GB RAM Raspberry Pi would be sufficient (keep in mind that SoHo routers and gateways are lightweight than that).
If you intend to use it for enteprise-grade purpose, just pick the lowest end server you could fine.
It’s probably going to come bundled with 4-cores CPU, 8 GB of RAM and whatever SSD and in any cases, it would be more than necessary, unless you really intend to handle 1000+ computing nodes being a multi-Gbps traffic.
Kaktus Instance
Kaktus instance are another story. If there’s one place you need to put your money on, here would be the place. The instance will handle as many virtual machines as can be and be part of the distributed Ceph storage cluster.
Sizing depends on your expected workload, there’s no accurate rule of thumb for that. You’ll need to think capacity planning ahead. How much vCPUs do you expect to run in total ? How many GBs of RAM ? How much disk ? What overcommit ratio do you expect to set ? How much data replication (and so … resilience) do you expect ?
These are all good questions to be asked. Note that you can easily start low with only a few Kaktus instances and scale up later on, as you grow. The various Kaktus instances from your fleet may also be heterogeneous (to some extent).
As a rule of thumb, unless you’re doing setting up a sandbox or home lab, a minimum of 3 Kaktus instance would be recommended. This allows you to move workload from one to another, or simply put one in maintenance mode (i.e. shutdown workload) while keeping business continuity.
Supposing you have X Kaktus instances and expect up to Y to be down at a given time, the following applies:
Instance Maximum Workload: (X - Y) / X %
Said differently, with only 3 machines, don’t go above 66% average load usage or you won’t be able to put one in maintenance without tearing down application.
Consequently, with availability in mind, better have more lightweight instances than few heavy ones.
Same applies (even more to Ceph storage cluster). Each instance local disk will be part of Ceph cluster (a Ceph OSD to be accurate) and data will be spread across those, from the same region.
Now, let’s consider you want to achieve 128 TB usable disk space. At first, you need to define your replication ratio (i.e. how many time objects storage fragments will be replicated across disks). We recommend a minimum of 2, and 3 for production-grade workloads. That means you’ll actually need a total of 384 TB of physical disks.
Here are different options to achieve it:
1 server with 24x 16TB SSDs each
3 servers with 8x 16TB SSDs each
3 servers with 16x 8TB SSDs each
8 servers with 6x 8TB SSDs each
[…]
From a purely resilient perspective, last option would be the best. It provides the more machines, with the more disks, meaning that if anything happens, the smallest fraction of data from the cluster will be lost. Lost data is possibly only ephemeral (time for server or disk to be brought up again). But while down, Ceph will try to re-copy data from duplicated fragments to other disks, inducing a major private network bandwidth usage. Now whether you only have 8 TB of data to be recovered or 128 TB may have a very different impact.
Also, as your virtual machines performance will be heavily tight to underlying network storage, it is vital (at least for production-grade workloads) to use NVMe SSDs with 10 to 25 Gbps network controllers and sub-millisecond latency between your private region servers.
So let’s recap …
Typical Kaktus instances for home labs or sandbox environments would look like:
4-cores (8-threads) CPUs.
16 GB RAM.
2x 1TB SATA or NVMe SSDs (shared between OS partition and Ceph ones)
1 Gbps NIC
While Kaktus instances for production-grade workload could easily look like:
32 to 128 cores CPUs.
128 GB to 1.5 TB RAM.
2x 256 GB SATA RAID-1 SSDs for OS.
6 to 12x 2-8 TB NVMe SSDs for Ceph.
10 to 25 Gbps NICs with link-agregation.
Important
Remember that you can start low and grow later on. All instances must not need to be alike (you can perfectly have “small” 32-cores servers and higher 128-cores ones). But completely heterogenous instances (especially on disk and network constraints) could have disastrous effects.
Keep in mind that all disks form all instances will be part of the same Ceph cluster, where any virtual machine instance can read and write data from. Mixing 25 Gbps network servers with fast NVMe SSDs with low-end 1 Gbps one with rotational HDDs would lower down your whole setup.
3.2 - Software Requirements
Get your toolchain ready
Kowabunga’s deployment philosophy relies on IaC (Infrastructure-as-Code) and CasC (Configuration-as-Code). We heavily rely on:
While natively compatible with the aformentionned, we recommend using Kowabunga Kobra as a toolchain overlay.
Kobra is a DevOps deployment swiss-army knife utility. It provides a convenient wrapper over OpenTofu, Ansible and Helmfile with proper secrets management, removing the hassle of complex deployment startegy.
Anything can be done without Kobra, but it makes things simpler, not having to care about the gory details.
Kobra supports various secret management providers. Please choose that fits your expected collaborative work experience.
At runtime, it’ll also make sure you’re OpenTofu / Ansible toolchain is properly set on your computer, and will do so otherwise (i.e. brainless setup).
Installation can be easily performed on various targets:
Just download and extract the tarball for your target.
Tips
Note that kobra is a simple wrapper around your favorite tools. If things don’t go as planned, you can turn on the debug flag, which will comes in handy (or simply show you what exact caommand-line is being invoked), e.g.
$ KOBRA_DEBUG=1 kobra ...
Setup Git Repository
Kowabunga comes with a ready-to-consumed platform template. One can clone it from Git through:
or better, fork it in your own account, as a boostraping template repository.
Secrets Management
Passwords, API keys, tokens … they are all sensitive and meant to be secrets. You don’t want any of those to leak on a public Git repository. Kobra relies on SOPS to ensure all secrets are located in an encrypted file (which is safe to to be Git hosted), which can be encrypted/decrypted on the fly thanks to a master key.
Kobra supports various key providers:
aws: AWS Secrets Manager
env: Environment variable stored master-key
file: local plain text master-key file (not recommended for production)
hcp: Hashicorp Vault
input: interactive command-line input prompt for master-key
keyring: local OS keyring (macOS Keychain, Windows Credentials Manager, Linux Gnome Keyring/KWallet)
If you’re building a large production-grade system, with multiple contributors and admins, using a shared key management system like aws or hcp is probably welcome.
If you’re single contributor or in a very small team, storing your master encryption key in your local keyring will do just fine.
Simply edit your kobra.yml file in the following section:
Thanks to that, any file from your inventory’s host_vars or group_vars directories, being suffixed as .sops.yml will automatically be included when running playbooks. It is then absolutely safe for you to use these encrypted-at-rest files to store your most sensitive variables.
Creating such files and/or editing these to add extra variables is then as easy as:
Kobra will automatically decrypt the file in-live, open the editor of your choice (as stated in your $EDITOR env var), and re-ecnrypt it with the master key at save/exit.
That’s it, you’ll never have to worry about secrets management and encryption any longer !
OpenTofu
The very same applies for OpenTofu, where SOPS master key is used to encrypt the most sensitive data. Anything sensitive you’d need to add to your TF configuration can be set in the terraform/secrets.yml file as simple key/value.
$ kobra secrets edit terraform/secrets.yml
Note however that their existence must be manually reflected into HCL formatted terraform/secrets.tf file, e.g.:
supposing that you have an encrypted my_service_api_token: ABCD…Z entry in your terraform/secrets.yml file.
Note that OpenTofu adds a very strong feature over plain old Terraform, being TF state file encryption. Where the TF state file is located (local, i.e. Git or remotely, S3 or alike) is up to you, but shall you use a Git located one, we strongly advise to have it encrypted.
You can achieve this easily by extending the terraform/providers.tf file in your platform’s repository:
terraform {
encryption {
key_provider"pbkdf2" "passphrase" {
passphrase =var.passphrase }
method"aes_gcm" "sops" {
keys =key_provider.pbkdf2.passphrase }
state {
method =method.aes_gcm.sops }
plan {
method =method.aes_gcm.sops }
}
}
variable"passphrase" { # Value to be defined in your local passphrase.auto.tfvars file.
# Content to be retrieved from decyphered secrets.yml file.
sensitive =true}
Then, create a local terraform/passphrase.auto.tfvars file with the secret of your choice:
passphrase ="ABCD...Z"
Warning
Note that you don’t want the terraform/passphrase.auto.tfvars (being plain-text) file to be stored on Git, so make sure it is well ignored in your .gitignore configuration.
Also, it’s strongly advised that whatever passphrase you’d chose to encrypt TF state is kept secure. A good practice would be to have it copied and defined in terraform/secrets.yml file, as any other sensitive variable, so to keep it vaulted.
3.3 - Network Topology
Our Tutorial network topology
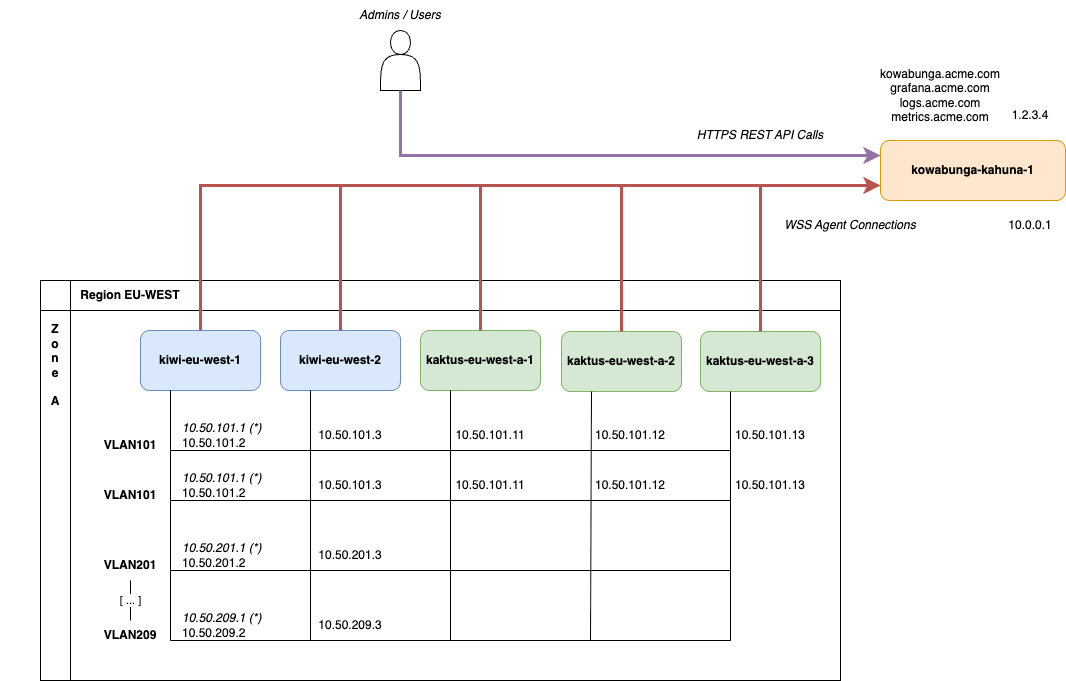
Let’s use this sample network topology for the rest of this tutorial:
We’ll start with a single Kahuna instance, with public Internet exposure. The instance’s hostname will be kowabunga-kahuna-1 and it has 2 network adapters and associated IP addresses:
a private one, 10.0.0.1, in the event we’d need to peer further one with other instances for hugh-availability.
a public one, 1.2.3.4, exposed as kowabunga.acme.com for WebUI, REST API calls to the orchestrator and WebSocket agents endpoint. It’ll also be exposed as grafana.acme.com, logs.acme.com and metrics.acme.com for Kiwi and Kaktus to push logs and and metrics and allow for service’s metrology.
Next is the main (and only) region, EU-WEST and its single zone, EU-WEST-A. The region/zone will feature 2 Kiwi instances and 3 Kaktus ones.
All instances will be connected under the same L2 network layer (as defined in requirements) and we’ll use different VLANs and associated network subnets to isolate content:
VLAN 0 (i.e. no VLAN) will be used as public segment, with associated RIPE block 4.5.6.0/26. All Kaktus instances will be able to bind these public IPs and translate those to Kompute virtual machine instances through bridged network adapters.
VLAN101 will be used as default, administration VLAN, with associated 10.50.101.0/24 subnet. All Kiwi and Kaktus instances will be part of.
VLAN102 will be used for Ceph backpanel, with associated 10.50.102.0/24 subnet. While not mandatory, this allows differentiating the administrative control plane traffic from pure storage cluster data synchronization. This allows for better traffic shaping and monitoring, if ever needs be. Note that on enterprise-grade production systems, Ceph project would recommend to use dedicated NIC for Ceph traffic, so isolation here makes sense.
VLAN201 to VLAN209 would be application VLANs. Kiwi will bind them, being region’s router, but Kaktus don’t. Instantiated VMs will however, through bridged network adapters.
Warning
It is suggested to use manual fixed-address for Kiwi and Kaktus instances. Being critical, you wouldn’t jeopardize the risk of service interruption because of a DHCP lease issue.
Note
Note that while Kiwi instances have static IP addresses (namely .2 and .3), they’ll also use a .1 as virtual IP (VIP), which is used for failover. Consequently, the .1 will always be the network’s router/gateway here, whichever Kiwi instace will hold it.
4 - Admin Guide
Provision your infrastructure
4.1 - Inventory Management
Declaring Infrastructure Assets
Now let’s suppose that you’ve cloned the Git platform repository template.
Inventory Management
It is now time to declare your various instances in Ansible’s inventory. Simply extend the ansible/inventories/hosts.txt the following way:
########### Global ###########[kahuna]kowabunga-kahuna-1 ansible_host=10.0.0.1 ansible_ssh_user=ubuntu################### EU-WEST Region ###################[kiwi_eu_west]kiwi-eu-west-1 ansible_host=10.50.101.2kiwi-eu-west-2 ansible_host=10.50.101.3[kaktus_eu_west]kaktus-eu-west-a-1 ansible_host=10.50.101.11kaktus-eu-west-a-2 ansible_host=10.50.101.12kaktus-eu-west-a-3 ansible_host=10.50.101.13[eu_west:children]kiwi_eu_westkaktus_eu_west################# Dependencies #################[kiwi:children]kiwi_eu_west[kaktus:children]kaktus_eu_west
In this example, we’ve declared our 6 instances (1 global Kahuna, 2 Kiwi and 3 Kaktus from EU-WEST region and their respective associated private IP addresses (used to deploy through SSH).
They respectively belong to various groups, and we’ve also created sub-groups. This is a special Ansible trick which will allow us to inherit variables from group each instance belongs to.
In that regard, considering the example of kaktus-eu-west1, the instance will be assigned variables from possibly various files. You can then safely:
declare host-specific variables in ansible/host_vars/kaktus-wu-west-1.yml file.
declare host-specific sensitive variables in ansible/host_vars/kaktus-eu-west-1.sops.yml file.
declare kaktus_eu_west group-specific variables in ansible/group_vars/kaktus_eu_west/main.yml file.
declare kaktus_eu_west group-specific sensitive variables in ansible/group_vars/kaktus_eu_west.sops.yml file.
declare kaktus group-specific variables in ansible/group_vars/kaktus/main.yml file.
declare kaktus group-specific sensitive variables in ansible/group_vars/kaktus.sops.yml file.
declare eu_west group-specific variables in ansible/group_vars/kaktus/eu_west.yml file.
declare eu_west group-specific sensitive variables in ansible/group_vars/eu_west.sops.yml file.
declare any other global variables in ansible/group_vars/all/main.yml file.
declare any other global sensitive variables in ansible/group_vars/all.sops.yml file.
This way, instance can inherit variables from its global type (kaktus), its region (eu_west), and a mix of both (kaktus_eu_west).
where acme.local would be your corporate private domain.
4.2 - Setup Kahuna
Let’s start with the orchestration core
Now let’s suppose that your Kahuna instance server has been provisioned with latest Ubuntu LTS distribution. Be sure that it is SSH-accessible with some local user.
Let’s take the following assumptions for the rest of this tutorial:
We only have one single Kahuna instance (no high-availability).
Local bootstrap user with sudo privileges is ubuntu, with key-based SSH authentication.
Kahuna instance is public-Internet exposed through IP address 1.2.3.4, translated to kowabunga.acme.com DNS.
Kahuna instance is private-network exposed through IP address 10.0.0.1.
Kahuna instance hostname is kowabunga-kahuna-1.
Setup DNS
Please ensure that your kowabunga.acme.com domain translates to public IP address 1.2.3.4. Configuration is up to you and your DNS provider and can be done manually.
Being IaC-supporters, we advise using OpenTofu for that purpose. Let’s see how we can do, using Cloudflare DNS provider.
Start by editing the terraform/providers.tf file in your platform’s repository:
By default, your platform is configured to pull a tagged official release from Ansible Galaxy. You may however prefer to pull it directly from Git, using latest commit for instance. This can be accommodated through:
Once defined, simply pull it into your local machine:
$ kobra ansible pull
Kahuna Settings
Kahuna instance deployment will take care of everything. It’ll take the assumption of running a supported Ubuntu LTS release, enforce some configuration and security settings, install the necessary packages, create local admin user accounts, if required, and setup some form of deny-all filtering policy firewall, so you’re safely exposed.
Admin Accounts
Let’s start by declaring some user admin accounts we’d like to create. We don’t want to keep on using the single nominative ubuntu account for everyone after all.
Simply create/edit the ansible/inventories/group_vars/all/main.yml file the following way:
to declare all your expected admin users, and add their respective SSH public key files in the ansible/files/pubkeys directory, e.g.:
$ tree ansible/files/pubkeys/
ansible/files/pubkeys/
└── admin_user_1
└── admin_user_2
Note
Note that all registered admin accounts will have password-less sudo privileges.
We’d also recommend you to set/update the root account password. By default, Ubuntu comes without any, making it impossible to login. Kowabunga’s playbook make sure that root login is prohibited from SSH for security reasons (e.g. brute-force attacks) but we encourage you setting one, as it’s always useful, especially on public cloud VPS or bare metal servers to get a console/IPMI access to log into.
If you intend to do so, simply edit the secrets file:
If you Kahuna instance is connected on public Internet, it is more than recommended to enable a network firewall. This can be easily done by extending the ansible/inventories/group_vars/kahuna/main.yml file with:
Note that we’re limited opened ports to SSH and HTTP/HTTPS here, which should be more than enough (HTTP is only used by Caddy server for certificate auto-renewal and will redirect traffic to HTTPS anyway). If you don’t expect your instance to be SSH-accessible on public Internet, you can safely drop this line.
MongoDB
Kahuna comes with a bundled, ready-to-be-used MongoDB deployment. This comes in handy if you only have a unique instance to manage. This remains however optional (default), as you may very well be willing to re-use an existing external production-grade MongoDB cluster, already deployed.
If you intend to go with the bundled one, a few settings must be configured in ansible/inventories/group_vars/kahuna/main.yml file:
This will basically instruct Ansible to install MongoDB server, configure it with a replicaset (so it can be part of a future cluster instance, we never know), secure it with admin credentials of your choice and create a kowabunga database/collection and associated service user.
Kahuna Settings
Finally, let’s ensure the Kahuna orchestrator gets everything he needs to operate.
You’ll need to define:
a custom email address (and associated SMTP connection settings) for Kahuna to be able to send email notifications to users.
a randomly generated key to sign JWT tokens (please ensure it is secure enough, not to compromise issued tokens robustness).
a randomly generated admin API key. It’ll be used to provision the admin bits of Kowabunga, until proper user accounts have been created.
a private/public SSH key-pair to be used by platform admins to seamlessly SSH into instantiated Kompute instances. Please ensure that the private key is being stored securely somewhere.
Then simply edit the ansible/inventories/group_vars/all/main.yml file the following way:
We’re done with configuration (finally) ! All we need to do now is finally run Ansible to make things live. This is done by invoking the kahuna playbook from the kowabunga.cloud collection:
$ kobra ansible deploy -p kowabunga.cloud.kahuna
Note that, under-the-hood, Ansible will use Ansible Mitogen extension to speed things up. Bear in mind that Ansible’s run is idempotent. Anything’s failing can be re-executed. You can also run it as many times you want, or re-run it in the next 6 months or so, provided you’re using a tagged collection, the end result will always be the same.
After a few minutes, if everything’s went okay, you should have a working Kahuna instance, i.e.:
A Caddy frontal reverse-proxy, taking care of automatic TLS certificate issuance, renewal and traffic termination, forwarding requests back to either Koala Web application or Kahuna backend server.
The Kahuna backend server itself, our core orchestrator.
Your Kahuna instance is now up and running, let’s get things and create a few admin users accounts. At first, we only have the super-admin API key that was previously set through Ansible deployment. We’ll make use of it to provision further users and associated teams. After all, we want a nominative user account for each contributor, right ?
Back to TF config, let’s edit the terraform/providers.tf file:
Make sure to edit the Kowabunga provider’s uri with the associated DNS of your freshly deployed Kahuna instance and edit the terraform/secrets.yml file so match the kowabunga_admin_api_key you’ve picked before. OpenTofu will make use of these parameters to connect to your private Kahuna and apply for resources.
Now declare a few users in your terraform/locals.tf file:
and the following resources definition in terraform/main.tf:
resource"kowabunga_user" "admins" {
for_each =local.admins name =each.key email =each.value.email role =each.value.role notifications =try(each.value.notify, false)
bot =try(each.value.bot, false)
}
resource"kowabunga_team" "admin" {
name ="admin" desc ="Kowabunga Admins" users =sort([forkey, userinlocal.admins:kowabunga_user.users[key].id])
}
Then, simply apply for resources creation:
$ kobra tf apply
What we’ve done here was to register a new admin team, with 3 new associated user accounts: 2 regular ones for human administrators and one bot, which you’ll be able to use its API key instead of the super-admin master one to further provision resources if you’d like.
Better do this way as, shall the key be compromised, you’ll only have to revoke it or destroy the bot account, instead of replacing the master one on Kahuna instance.
Newly registered user will be prompted with 2 emails from Kahuna:
a “Welcome to Kowabunga !” one, simply asking yourself to confirm your account’s creation.
a “Forgot about your Kowabunga password ?” one, prompting for a password reset.
Warning
Account’s creation confirmation is required for the user to proceed further. For security purpose, newly created user accounts are locked-down until properly activated.
With security in mind, Kowabunga will prevent you from setting your own password. Whichever IT policy you’d choose, you will always end up with users having a weak password or finding a way to compromise your system. We don’t want that to happen, nor do we think it’s worth asking a user to generate a random ‘strong-enough’ password by himself, so Kowabunga does it for you.
Once users have been registered and password generated, and provided Koala Web application has been deployed as well, they can connect to (and land on a perfectly empty and so useless dashboard ;-) for now at least ).
Note that, despite have 2 Kiwi instances, from Kowabunga perspective, we’re only registering one. This is because, the 2 instances are only used for high-availability and failover perspective. From service point of view, the region only has one single network gateway.
Despite that, each instance will have its own agent, to establish a WebSocket connection to Kahuna orchestrator.
Kaktus Instances and Agents
Let’s continue with the 3 Kaktus instances declaration and their associated agents. Note that, this time, instances are associated to the zone itself, not the region.
Information
Note that Kaktus instance creation/update takes 4 specific parameters into account:
cpu_price and memory_price are purely arbitrary values that express how much actual money is worth your metal infrastructure. These are used to compute virtual cost calculation later, when you’ll be spawning Kompute instances with vCPUs and vGB of RAM. Each server being different, it’s fully okay to have different values here for your fleet.
cpu_overcommit and memory_overcommit define the overcommit ratio you accept your physical hosts to address. As for price, not every server is born equal. Some have hyper-threading, other don’t. You may consider that a value of 3 or 4 is fine, other tend to be stricter and use 2 instead. The more you set the bar, the more virtual resources you’ll be able to create but the less actual physical resources they’ll be able to get.
That done, Kiwi and Kaktus instances have been registered, but more essentially, their associated agents. For each newly created agent, you should have received an email (check the admin one you previously set in Kahuna’s configuration). Keep track of these emails, they contain one-time credentials about the agent identifier and it’s associated API key.
This is the super secret thing that will allow them further to establish secure connection to Kahuna orchestrator. We’re soon going to declare these credentials in Ansible’s secrets so Kiwi and Kaktus instances can be provisioned accordingly.
Warning
There’s no way to recover the agent API key. It’s never printed anywhere but on the email you just received. Even the database doesn’t contain it. If one agent’s API key is lost, you can either request a new one from API or destroy the agent and create a new one in-place.
Virtual Networks
Let’s keep on provisioning Kahuna’s database with the network configuration from our network topology.
We’ll use different VLANs (expressed as VNET or Virtual NETwork in Kowabunga’s terminology) to segregate tenant traffic:
VLAN 0 (i.e. no VLAN) will be used for public subnets (i.e. where to hook public IP addresses).
VLAN 102 will be dedicated to storage backend.
VLANs 201 to 209 will be reserved for tenants/projects (automatically assigned at new project’s creation).
Note
Note that exposing Ceph storage network might come in handy if you intend to run applications which are expected to consume or provision resources directly on the underlying storage.
By default, if you only intend to use plain old Kompute instances, virtual disks are directly mapped by virtualization and you don’t have to care about how. In that case, there’s no specific need to expose VLAN 102.
If you however expect to further use KFS or running your own Kubernetes flavor, with an attempt to directly use Ceph backend to instantiate PVCs, exposing the VLAN 102 is mandatory.
To be on the safe side, and future-proof, keep it exposed.
So let’s extend our terraform/main.tf with the following VNET resources declaration for the newly registered region.
What have we done here ? Simply iterating over VNETs to associate those with VLAN IDs and the name of Linux bridge interfaces which will be created on each Kaktus instance from the zone (see further).
Note
Note that while services instances will have dedicated reserved networks, we’ll (conventionally) add the VLAN 0 here (which is not really a VLAN at all).
Kaktus instances will be created with a br0 bridge interface, mapped on host private network controller interface(s), where public IP addresses will be bound. This will allow further create virtual machines to be able to bind public IPs through the bridged interface.
Subnets
Now that virtual networks have been registered, it’s time to associate each of them with service subnets. Again, let’s edit our terraform/main.tf to declare resources objects, on which we’ll iterate.
Subnet objects are associated with a given virtual network and usual network settings (such as CIDR, route/gateway, DNS server) are associated.
Note the use of 2 interesting parameters:
reserved, which is basically a list of IP addresses ranges, which are part of the provided CIDR, but not not to be assigned to further created virtual machines and services. This may come in handy if you have specific use of static IP addresses in your project and want to ensure they’ll never get assigned to anyone programmatically.
gw_pool, which is a range of IP addresses that are to be assigned to each project’s Kawaii instances as virtual IPs. These are fixed IPs (so that router address never changes, even if you do destroy/recreate service instances countless times). You usually need one per zone, not more. But it’s safe to extend the range for future-use (e.g. adding new zones in your region).
Now let’s declare the various subnets in terraform/locals.tf file as well:
Note that we arbitrary took multiple decisions here:
Reserve the first 69 IP addresses of the 10.50.102.0/24 subnet for our region growth. Each project’s Kawaii instance (one per zone) will bind an IP from the range. That’s plain enough room for the 10 projects we intend to host. But this saves us some space, shall we need to extend our infrastructure, by adding new Kaktus instances.
Use of /24 subnets. This is really up to each network administrator. You could pick whichever range you need which wouldn’t collapse with what’s currently in place.
Limit virtual network to one single subnet. We could have added as much as needed.
Reserve the first 5 IPs of each subnet. Remember, our 2 Kiwi instances are already configured to bind .2 and .3 (and .1 is the VIP). We’ll save a few extra room for future use (one never knows …).
Reserve the subnet’s last 3 IP addresses for Kawaii gateways virtual IPs. We only have one zone for now, so 1 would have been enough, but again, we never know what the future holds …
Warning
It is now time to read carefully what you wrote, really do. We just wrote down a bloated list of network settings, subnets, CIDRs, IP addresses and mistake have probably happened. While nothing’s written in stone (you can always apply TF config again), better find it now, that wasting hours trying to figure out later why your virtual machine doesn’t get network access ;-)
Once carefully reviewed, again, apply:
$ kobra tf apply
One more thing, let’s reflect those changes in Ansible’s configuration as well.
Simply extend your ansible/inventories/group_vars/eu_west/main.yml file the following way:
with VLAN 101 as administrative segment with 10.50.101.2,
with VLAN 102 as storage segment with 10.50.102.2,
with VLAN 201 to 209 as service VLANs.
kiwi-eu-west-1:
with VLAN 101 as administrative segment with 10.50.101.3,
with VLAN 102 as storage segment with 10.50.102.3,
with VLAN 201 to 209 as service VLANs.
Note that 10.50.101.1 and 10.50.102.1 will be used as virtual IPs (VIPs).
Inventory Management
If required, update your Kiwi instances in Ansible’s inventory.
Important
Note that for the first-time installation, private IPs from the inventory are to replaced by the servers private ones (or anything in place which allows for bootstrapping machines).
The instances are now declared to be part of kiwi, kiwi_eu_west and eu_west groups.
Network Configuration
We’ll instruct the Ansible collection to provision network settings through Netplan. Note that our example is pretty simple, with only a single network interface to be used for private LAN, no link aggregation being used (recommended for enterprise-grade setups).
As the configuration is both instance-specific (private MAC address, IP address …), region-specific (all Kiwi instance will do likely the same), and, as such, repetitive, we’ll use some Ansible overlaying.
We’ve already declare quite a few stuff at region level when creating eu-west one.
Let’s now extend the ansible/inventories/group_vars/kiwi_eu_west/main.yml file with the following:
kowabunga_netplan_config:
ethernet:
- name: "{{ kowabunga_host_underlying_interface }}"mac: "{{ kowabunga_host_underlying_interface_mac }}"ips:
- "4.5.6.{{ kowabunga_host_public_ip_addr_suffix }}/26"routes:
- to: default
via: 4.5.6.1vlan: | {%- set res=[] -%}
{%- for r in kowabunga_region_vlan_id_ranges -%}
{%- for id in range(r.from, r.to + 1, 1) -%}
{%- set dummy = res.extend([{"name": "vlan" + id | string, "id": id, "link": kowabunga_host_vlan_underlying_interface, "ips": [r.net_prefix | string + "." + id | string + "." + kowabunga_host_vlan_ip_addr_suffix | string + "/" + r.net_mask | string]}]) -%}
{%- endfor -%}
{%- endfor -%}
{{- res -}}
As ugly as it looks, this Jinja macro will help us iterate over all the VLAN interfaces we need to create by simply taking a few instance-specific variables into consideration.
And that’s exactly what we’ll define in ansible/inventories/host_vars/kiwi-eu-west-1 file:
You’ll need to ensure that the MAC addresses and host and gateway IP addresses are correctly set, depending on your setup. Once done, you can do the same for the alternate Kiwi instance in ansible/inventories/host_vars/kiwi-eu-west-2.yml file.
Extend the ansible/inventories/group_vars/kiwi/main.yml file with the following to ensure generic settings are propagated to all Kiwi instances:
Note that setting kowabunga_netplan_disable_cloud_init is an optional step. If you’d like to keep whatever configuration cloud-init has previously set, it’s all fine (but it’s always recommended not to have dual source of truth).
Network Failover
Each Kiwi instance configuration is now set to receive host-specific network configuration. But they are meant to work in an HA-cluster, so let’s define some redundancy rules. The two instances respectively bind the .2 and .3 private IPs from each subnet, but our active router will be .1, so let’s define network failover configuration for that.
Again, extend the region-global ansible/inventories/group_vars/kiwi_eu_west/main.yml file with the following configuration:
kowabunga_kiwi_primary_host: "kiwi-eu-west-1"kowabunga_network_failover_settings:
peers: "{{ groups['kiwi_eu_west'] }}"use_unicast: truetrackers:
- name: kiwi-eu-west-vip
configs: | {%- set res = [] -%}
{%- for r in kowabunga_region_vlan_id_ranges -%}
{%- for id in range(r.from, r.to + 1, 1) -%}
{%- set dummy = res.extend([{"vip": r.net_prefix | string + "." + id | string + ".1/" + r.net_mask | string, "vrid": id, "primary": kowabunga_kiwi_primary_host, "control_interface": kowabunga_primary_network_interface, "interface": "vlan" + id | string, "nopreempt": true}]) -%}
{%- endfor -%}
{%- endfor -%}
{{- res -}}
Once again, we iterate over kowabunga_region_vlan_id_ranges variable to create our global configuration for eu-west region. After all, both Kiwi instances from there will have the very same configuration.
This will ensure that VRRP packets flows between the 2 peers so one always ends up being the active router for each virtual network interface.
Firewall Configuration
When running the Ansible playbook, Kiwi instances will be automatically configured as network routers. This is mandatory to ensure packets flow from WAN to LAN (and reciprocally) to inter-VLANs for services.
Configuring the associated firewall may then comes in handy.
There 2 possible options:
Kiwi remains a private gateway, non-exposed to public Internet. This may be the case if you intend to only run Kowabunga as private corporate infrastructure only. Projects will get their own private network and the ‘public’ one will actually consist of one of your company’s private subnet.
Kiwi is a public gateway, exposed to public Internet.
In all cases, extend the ansible/inventories/group_vars/kiwi/main.yml file with the following to enable firewalling:
kowabunga_firewall_enabled: true
In our first case scenario, simply configure the firewall as pass-through NAT gateway. Traffic from all interfaces will simply be forwarded:
kowabunga_firewall_passthrough_enabled: true
In the event of a public gateway, things are a bit more complex, and you should likely refer to the Ansible firewall module documentation to declare the following:
with actual rules, depending on your network configuration and access means and policy (e.g. remote VPN access).
PowerDNS Setup
Information
Documentation below is ephemeral.
Kiwi currently relies on PowerDNS as a third-party DNS server. Current deployment comes bundled, associated with a MariaDB backend.
This is a temporary measure only. Next stable versions of Kiwi will soon feature a standalone DNS server implementation, nullifying all third-aprty dependencies and configuration requirements.
In order to deploy and configure PowerDNS and its associated MariaDB database backend, one need to extend Ansible configuration.
Let’s now reflect some definitions into Kiwi’s ansible/inventories/group_vars/kiwi_eu_west/main.yml configuration file:
This will further instruct PowerDNS to handle local DNS zone for region eu-west on acme.local TLD.
Note that we’ll use the Kaktus instances VLAN 102 IP addresses that we’ve defined in network toplogy so that ceph.storage.eu-west.acme.local will be a round-robin DNS to these instances.
Finally, edit the SOPS-encrypted ansible/inventories/group_vars/kiwi.sops.yml file with newly defined secrets:
As names stand, first 2 variables will be used to expose PowerDNS API (which will be consumed by Kiwi agent) and last twos are MariaDB credentials, used by PowerDNS to connect to. None of these passwords really matter, they’re server-to-server internal use only, no use is ever going to make use of them. But let’s use something robust nonetheless.
Kiwi Agent
Finally, let’s take care of Kiwi agent. The agent will establish its secured WebSocket connection to Kahuna, receives configuration changes from, and apply accordingly.
Now remember that we previously used TF to register new Kiwi agents. Once applied, emails were sent for each instance with a set of agent identifier and API key. These values now have to be provided to Ansible, as these are going to be the credentials used by Kiwi agent to connect to Kahuna.
So let’s edit each Kiwi instance secrets file in respectively ansible/inventories/host_vars/kiwi-eu-west-{1,2}.sops.yml files:
We’re finally done with Kiwi’s configuration. All we need to do now is finally run Ansible to make things live. This is done by invoking the kiwi playbook from the kowabunga.cloud collection:
with VLAN 101 as administrative segment with 10.50.101.11,
with VLAN 102 as storage segment with 10.50.102.11,
with VLAN 201 to 209 as service VLANs.
kaktus-eu-west-a-2:
with VLAN 101 as administrative segment with 10.50.101.12,
with VLAN 102 as storage segment with 10.50.102.12,
with VLAN 201 to 209 as service VLANs.
kaktus-eu-west-a-3:
with VLAN 101 as administrative segment with 10.50.101.13,
with VLAN 102 as storage segment with 10.50.102.13,
with VLAN 201 to 209 as service VLANs.
Pre-Requisites
Kaktus nodes will serve both as computing and storage backends. While computing is easy (one just need to ease available CPU and memory), storage is different as we need to prepare hard disks (well … SSDs) and set them up to be part of a coherent Ceph cluster.
As a pre-requisite, you’ll then need to ensure that your server has freely available disks for that purpose.
If you only have limited disks on your system (e.g. only 2), Ceph storage will be physically collocated with your OS. Best scenario would then be to:
partition your disks to have a small reserved partition (e.g. 32 to 64 GB) to your OS
possibly do the same on another disk so you can use software RAID-1 for sanity.
partition the rest of your disk for future Ceph usage.
In that case, parted is your friend for the job. It also means you need to ensure, at OS installation stage, that you don’t let distro partitioner use your full device.
Recommendation
As much as can be, we however recommend you to have dedicated disks for Ceph cluster. An enterprise-grade setup would use some small SATA SSDs in RAID-1 for OS and as many dedicated NVMe SSDs as Ceph-reserved data disks.
Inventory Management
If required, update your Kaktus instances in Ansible’s inventory.
Important
Note that for the first-time installation, private IPs from the inventory are to replaced by the servers private ones (or anything in place which allows for bootstrapping machines).
The instances are now declared to be part of kaktus, kaktus_eu_west and eu_west groups.
Network Configuration
We’ll instruct the Ansible collection to provision network settings through Netplan. Note that our example is pretty simple, with only a single network interface to be used for private LAN, no link aggregation being used (recommended for enterprise-grade setups).
As the configuration is both instance-specific (private MAC address, IP address …), region-specific (all Kaktus instance will do likely the same), and, as such, repetitive, we’ll use some Ansible overlaying.
We’ve already declare quite a few stuff at region level when creating eu-west one.
Let’s now extend the ansible/inventories/group_vars/kaktus_eu_west/main.yml file with the following:
kowabunga_netplan_vlan_config_default:
# EU-WEST admin network - name: vlan101
id: 101link: "{{ kowabunga_host_vlan_underlying_interface }}"ips:
- "{{ kowabunga_region_domain_admin_host_address }}/{{ kowabunga_region_domain_admin_network | ansible.utils.ipaddr('prefix') }}"routes:
- to: default
via: "{{ kowabunga_region_domain_admin_router_address }}"# EU-WEST storage network - name: vlan102
id: 102link: "{{ kowabunga_host_vlan_underlying_interface }}"kowabunga_netplan_bridge_config_default:
- name: br0
interfaces:
- "{{ kowabunga_host_underlying_interface }}" - name: br102
interfaces:
- vlan102
ips:
- "{{ kowabunga_region_domain_storage_host_address }}/{{ kowabunga_region_domain_storage_network | ansible.utils.ipaddr('prefix') }}"routes:
- to: default
via: "{{ kowabunga_region_domain_storage_router_address }}"metric: 200# Region-generic configuration template, variables set at host levelkowabunga_netplan_config:
ethernet:
- name: "{{ kowabunga_host_underlying_interface }}"mac: "{{ kowabunga_host_underlying_interface_mac }}"vlan: | {%- set res = kowabunga_netplan_vlan_config_default -%}
{%- for r in kowabunga_region_vlan_id_ranges[1:] -%}
{%- for id in range(r.from, r.to + 1, 1) -%}
{%- set dummy = res.extend([{"name": "vlan" + id | string, "id": id, "link": kowabunga_host_vlan_underlying_interface}]) -%}
{%- endfor -%}
{%- endfor -%}
{{- res -}}bridge: | {%- set res = kowabunga_netplan_bridge_config_default -%}
{%- for r in kowabunga_region_vlan_id_ranges[1:] -%}
{%- for id in range(r.from, r.to + 1, 1) -%}
{%- set dummy = res.extend([{"name": "br" + id | string, "interfaces": ["vlan" + id | string]}]) -%}
{%- endfor -%}
{%- endfor -%}
{{- res -}}
As for Kiwi previously, this looks like a dirty Jinja hack but it actually comes handy, saving you from copy/paste mistakes and iterating over all VLANs and bridges. We’ll still need to add instance-specific variables, by extending the ansible/inventories/host_vars/kaktus-eu-west-a-1 file:
You’ll need to ensure that the physical interface, MAC address and host admin+storage network addresses are correctly set, depending on your setup. Once done, you can do the same for the alternate Kaktus instances in ansible/inventories/host_vars/kaktus-eu-west-a-{2,3}.yml files.
Extend the ansible/inventories/group_vars/kaktus/main.yml file with the following to ensure generic settings are propagated to all Kaktus instances:
Note that setting kowabunga_netplan_disable_cloud_init is an optional step. If you’d like to keep whatever configuration cloud-init has previously set, it’s all fine (but it’s always recommended not to have dual source of truth).
Information
Note that, by opposition to Kiwi instances, services VLAN (201 to 209) interfaces will be left unconfigured (i.e. no IP address). None is actually needed, as we’re creating bridge interfaces on top, which are meant for further Kompute virtual instances to be able to bind the appropriate underlying VLAN interface.
Storage Setup
It is now time to setup the Ceph cluster ! As complex as it may sounds (and it is), Ansible will populate everything for you.
So let’s start by defining a new cluster identifier and associated region, through ansible/inventories/group_vars/kaktus_eu_west/main.yml file:
The FSID is a simple UUID. It’s only constraint is to be unique amongst your whole network (should you have multiple Ceph clusters). Keep track of it, we’ll need to push this information to Kowabunga DB later on.
Monitors and Managers
Ceph cluster comes with several nodes as monitors. Simply put they are exposing the Ceph cluster API. You don’t need all nodes to be monitors. One is enough, while 3 is recommended, for high-availability and distributing workload. Each Kaktus instance can be turned into a Ceph monitor node.
One simply need to declare so in ansible/inventories/host_vars/kaktus-eu-west-a-{1,2,3}.yml instance-specific file:
Having more than 3 monitors in your cluster is not necessarily useful. If you have more than 3 instances in your region and need to choose, simply pick the most powerful servers (hardware characteristics wise) and they’ll process the heavy lifting.
Also be sure that those nodes (and those nodes only !) are defined in Kiwi’s DNS regional configuration under ceph record.
Ceph cluster also comes with managers. As in real-life, they don’t do much ;-) Or at least, they’re not as vital as monitors. They however expose various metrics. Having one is nice, more than that will only help with failover. As for monitors, one can enable it for a Kaktus in ansible/inventories/host_vars/kaktus-eu-west-a-{1,2,3}.yml instance-specific file:
kowabunga_ceph_manager_enabled: true
and its related administration password in ansible/inventories/group_vars/kaktus.sops.yml file:
This will help you connect to Ceph cluster WebUI, which is always handy when troubleshooting is required.
Authentication keyrings
Once running, Ansible will also generate specific keyrings at cluster’s boostrap. Once generated, these keyrings will be locally stored (and for you to be added to source control) and deployed to further nodes.
So let’s define where to store these files in ansible/inventories/group_vars/kaktus/main.yml file:
Once provisioned, you’ll end up with a regional sub-directory (e.g. eu-west), containing 3 files:
ceph.client.admin.keyring
ceph.keyring
ceph.mon.keyring
Important
These files are keyring and extremely sensitive. Anyone with access to these files and your private network gets a full administrative control over the Ceph cluster.
So keep track of them, but do it smartly. As they are plain-text, let’s ensure you don’t store them on Git that way.
before being pushed. Ansible will automatically decrypt them on the fly, should they end up with .sops extension.
Disks provisioning
Next step is about disks provisioning. Your cluster will contain several disks from several instances (the ones you’ve either partitioned or left untouched at pre-requisite stage). Each instance may have different topology, different disks, different sizes etc … Disks (or partitions, whatever) are each managed by a Ceph OSD daemon.
So we need to reflect this topology into each instance-specific ansible/inventories/host_vars/kaktus-eu-west-a-{1,2,3}.yml file:
For each instance, you’ll need to declare disks that are going to be part of the cluster. The dev parameter simply maps to the device file itself (it is more than recommended to use /dev/disk/by-id mapping instead of bogus /dev/nvme0nX naming, which can change across reboots). The weight parameter will be used for Ceph scheduler for object placement and corresponds to each disk size in TB unit (e.g. 1.92 TB SSD would have a 1.92 weight). And finally the id identifier might be the most important of all. This is the UNIQUE identifier across your Ceph cluster. Whichever the disk ID you use, you need to ensure than no other disk in no other instance uses the same identifier.
Data Pools
Once we have disks aggregated, we must create data pools on top. Data pools are a logical way to segment your global Ceph cluster usage. Definition can be made in ansible/inventories/group_vars/kaktus_eu_west/main.yml file, as:
2 of type rbd (RADOS block device), for further be used by KVM or a future Kubernetes cluster to provision virtual block device disks.
2 of type fs (filesystem), for further be used as underlying NFS storage backend.
Each pool relies on Ceph Placement Groups for objects fragments distribution across disks in the cluster. There’s no rule of thumb on how much one need. It depends on your cluster size, its number of disks, its replication factor and many more parameters. You can get some help thanks to Ceph PG Calculator to set an appropriate value.
The replication parameter controls the cluster’s data redundancy. The bigger the value, the more replicated data will be (and the less prone to disaster you will be), but the fewer usable space you’ll get.
File Systems
Shall you be willing to share your Ceph cluster as a distributed filesystem (e.g. with Kylo service), you’ll need to enable CephFS support.
Once again, this can be enabled through instance-specific definition in ansible/inventories/host_vars/kaktus-eu-west-a-{1,2,3}.yml file:
kowabunga_ceph_fs_enabled: true
and more globally in ansible/inventories/group_vars/kaktus/main.yml
where we’d instruct Ceph to use our two previously created pools for underlying storage.
Storage Clients
Finally, we must declare clients, allowed to connect to our Ceph cluster. We don’t really expect remote users to connect to, only libvirt instances (and possibly kubernetes instances, shall we deploy such), so declaring these in ansible/inventories/group_vars/kaktus/main.yml file should be enough:
Finally, let’s take care of Kaktus agent. The agent will establish its secured WebSocket connection to Kahuna, receives configuration changes from, and apply accordingly.
Now remember that we previously used TF to register new Kaktus agents. Once applied, emails were sent for each instance with a set of agent identifier and API key. These values now have to be provided to Ansible, as these are going to be the credentials used by Kaktus agent to connect to Kahuna.
So let’s edit each Kaktus instance secrets file in respectively ansible/inventories/host_vars/kaktus-eu-west-a-{1,2}.sops.yml files:
We’re finally done with Kaktus’s configuration. All we need to do now is finally run Ansible to make things live. This is done by invoking the kaktus playbook from the kowabunga.cloud collection:
What we’re doing here is instructing Kahuna that there’s a Ceph storage pool that can be used to provision RBD images. It will connect to ceph DNS record on port 3300, and use one of the 3 agents defined to connect to pool rbd. It’ll also arbitrary (as we did for Katkus instances) set the global storage pool price to 200 EUR / month, so virtual resource cost computing can happen.
Warning
Take care of updating the YOUR_CEPH_FSID secret value with the one you’ve set in Ansible kowabunga_ceph_fsid variable. Libvirt won’t be able to reach the cluster without this information.
And apply:
$ kobra tf apply
NFS Storage
Now if you previously created an NFS endpoint want to expose it through Kylo services, you’ll also need to setup the following TF resources:
In a very same way, this simply instructs Kahuna how to access NFS resources and provide Kylo services. you must ensure that endpoint and backends values map to your local storage domain and associated Kaktus instances. They’ll be used further by Kylo instances to create NFS shares over Ceph.
And again, apply:
$ kobra tf apply
OS Image Templates
And finally, let’s declare OS image templates. Without those, you won’t be able to spin up any kind of Kompute virtual machines instances after all. Image templates must be ready-to-boot, cloud-init compatible and either in QCOW2 (smaller to download, prefered) or RAW format.
Up to you to use pre-built community images or host your own custom one on a public HTTP server.
Warning
Note that URL must be reachable from Kaktus nodes, not Kahuna one (so can be private network).
The module however does not support authentication at the moment, so images must be “publicly” available.
locals { # WARNING: these must can be in either QCOW2 (recommended) or RAW format
# Example usage for conversion, if needed:
# $ qemu-img convert -f qcow2 -O raw ubuntu-22.04-server-cloudimg-amd64.img ubuntu-22.04-server-cloudimg-amd64.raw
templates = {
"ubuntu-cloudimg-generic-24.04" = {
desc ="Ubuntu 24.04 (Noble)",
source ="https://cloud-images.ubuntu.com/noble/20250805/noble-server-cloudimg-amd64.img" default =true }
}
}
resource"kowabunga_template" "eu-west" {
for_each =local.templates pool =kowabunga_storage_pool.eu-brezel["eu-west-ssd"].id name =each.key desc =each.value.desc os =try(each.value.os, "linux")
source =each.value.source default =try(each.value.default, false)
}
At creation, declared images will be download by one of the Kaktus agent and stored into Ceph cluster. After that, one can simply reference them by their name when creating Kompute instances.
Warning
Depending on remote source, image size and your network performance, retrieving images can take a significant amount of time (several minuutes). TF provider is set to use a 30mn timeout by default. Update it accordingly if you believe this won’t be enough.
Congratulations, you’re now done with administration tasks and infrastructure provisionning. You now have a fully working Kowabunga setup, ready to be consumed by end users.
In Kowabunga, a project is a virtual environment where all your resources are going to be created.
Projects can:
be spawned over multiple regions. For each selected region, a dedicated virtual network and subnet will be automatically spawned (one from those created/reserved at admin provisioning stage). This ensures complete project’s resources isolation.
be administrated by multiple teams (e.g. the infrastructure admin one and the project application one).
use quotas (maximum instances, vCPUs, memory, storage) to limit global HCI resources usage and starvation. A value of 0 means unlimited quota.
use a private set of bootstrap keys (instead of global infrastructure one), so each newly created resource can be bootstrapped with a specific keypair, until fully provisioned.
The project default admin/root password, set at cloud-init instance bootstrap phase. Will be randomly auto-generated at each instance creation if unspecified.
As a superAdmin user, one can create a the acme project, for admin team members, limited to eu-west region, with unlimited resources quota, and requesting a /25 subnet (at least), the following way:
data"kowabunga_region" "eu-west" {
name ="eu-west"}
data"kowabunga_team" "admin" {
name ="admin"}
resource"kowabunga_project" "acme" {
name ="acme" desc ="ACME project" regions = [data.kowabunga_region.eu-west.id]
teams = [data.kowabunga_team.admin.id]
domain ="acme.local" tags = ["acme", "production"]
metadata = {
"owner": "Kowabunga Admin",
}
max_instances =0 max_memory =0 max_vcpus =0 max_storage =0 subnet_size =25}
Your project is now live and does virtually nothing. Let’s move further by creating our first resource, the Kawaii Internet Gateway.
5.2 - Services
Discover Kowabunga pre-baked services
Kowabunga provides more than just raw infrastructure resources access. It features various “ready-to-be-consumed” -as-a-service extensions to easily bring life to your various application and automation deployment needs.
5.2.1 - Kawaii Internet Gateway
Kowabunga Internet Gateway
Kawaii is your project’s private Internet Gateway, with complete ingress/egress control. It stands for Kowabunga Adaptive WAn Intelligent Interface (if you have better ideas, we’re all ears ;-) ).
It is the network gateway to your private network. All Kompute (and other services) instances always use Kawaii as their default gateway, relaying all traffic.
Kawaii itself relies on the underlying region’s Kiwi SD-WAN nodes to provide access to both public networks (i.e. Internet) and possibly other projects’ private subnets (when requested).
Kawaii is always the first service to be created (more exactly, other instances cloud-init boot sequence will likely wait until they reach a proper network connectivity, as Kawaii provides). Being critical for your project’s resilience, Kawaii uses Kowabunga’s concept of Multi-Zone Resources (MZR) to ensure that, when the requested regions feature multiple availability zones, a project’s Kawaii instance gets created in each zone.
Using multiple floating virtual IP (VIP) addresses with per-zone affinity, this guarantees that all instantiates services will always be able to reach their associated network router. As much as can be, using weighted routes, service instances will target their zone-local Kawaii instance, the best pick for latency. In the unfortunate event of local zone’s failure, network traffic will then automatically get routed to other zone’s Kawaii (with an affordable extra millisecond penalty).
While obviously providing egress capability to all project’s instance, Kawaii can also be used as an egress controller, exposed to public Internet through dedicated IPv4 address. Associated with a Konvey or Kalipso load-balancer, it make it simple to expose your application publicly, as one would do with a Cloud provider.
Kowabunga’s API allows for complete control of the ingress/egress capability with built-in firewalling stack (deny-all filtering policy, with explicit port opening) as well as peering capabilities.
This allows you to inter-connect your project’s private network with:
VPC peering with other Kowabunga-hosted projects from the same region (network translation and routing being performed by underlying Kiwi instances).
IPSEC peering with non-Kowabunga managed projects and network, from any provider.
Warning
Keep in mind that peering requires a bi-directional agreement. Connection and possibly firewalling must be configured at both endpoints.
Note that thanks to Kowabunga’s internal network architecture and on-premises network backbone, inter-zones traffic is a free-of-charge possibility ;-) There’s no reason not to spread your resources on as many zones as can be, you won’t ever see any end-of-the-month surprise charge.
Resource Creation
As a projectAdmin user, one can create a Kawaii Internet gateway for the acme project in eu-west region the following way:
data"kowabunga_region" "eu-west" {
name ="eu-west"}
resource"kowabunga_kawaii" "gw" {
project =kowabunga_project.acme.id region =data.kowabunga_region.eu-west.id}
You may refer to TF documentation to extend Kawaii gateway with VPC peering and custom egress/ingress/nat rules.
VPC Peering
Kowabunga VPC peering allows you to inter-connect 2 projects subnets. This can come in handy if you have 2 specific applications, managed by different set of people, and still need both to communicate all together.
The following example extends our Kawaii gateway configuration to peer with 2 subnets:
the underlying Ceph one, used to directly access storage resources.
the one form marvelous project, allowing bi-directional connectivity through associated ingress/egress firewalling rules.
Note that setting up VPC peering requires you to configure and allow connectivity on both projects ends. Network is bi-directional and, for security measures, one project cannot arbitrary decide to peer with another one without mutual consent.
IPsec Peering
Alternatively, it is also possible to setup an IPsec peering connection with Kawaii, should you need to provide some admin users with remote access capabilities.
This allows connecting your private subnet with other premises or Cloud providers as to extend the reach of services behind the walls of Kowabunga.
The above example extend our Kawaii instance with an IPsec connection with the ACME remote office. The remote IPsec engine public IP address will be 5.6.7.8 and expose the private network 172.16.1.0/24.
It comes without saying but setting up an IPsec tunnel requires you to:
Expose both ends publicly
Configure tunnel connectivity both ways.
Configure both ends firewall, if necessary.
5.2.2 - Kompute Virtual Instance
Kowabunga Virtual Machine instance
Kowabunga Kompute is the incarnation of a virtual machine instance.
Associated with underlying distributed block storage, it provides everything one needs to run generic kind of application workload.
Kompute instance can be created (and further edited) with complete granularity:
number of virtual CPU cores.
amount of virtual memory.
one OS disk and any number of extra data disks.
optional public (i.e. Internet) direct exposure.
Compared to major Cloud providers who will only provide pre-defined machine flavors (with X vCPUs and Y GB of RAM), you’re free to address machines to your exact needs.
Kompute instances are created and bound to a specific region and zone, where they’ll remain. Kahuna orchestration will make sure to instantiate the requested machine on the the best Kaktus hypervisor (at the time), but thanks to underlying distributed storage, it can easily migrate to any other instance from the specified zone, for failover or balancing.
Kompute’s OS disk image is cloned from one of the various OS templates you’ll have provided Kowabunga with and thanks to thin-provisioning and underlying copy-on-write mechanisms, no disk space is ever redeemed. Feel free to allocate 500 GB of disk, it’ll never get consumed until you actually store data onto !
Like any other service, Kompute instances are bound to a specific project, and consequently associated subnet, making it sealed from other projects’ reach. Private and public interfaces IP addresses are automatically assigned by Kahuna, as defined by administrator, making it ready to be consumed for end-user.
Resource Creation
As a projectAdmin user, one can create a Kompute virtual machine instance. Example below will spawn a 8 vCPUS, 16 GB RAM, 64 GB OS disk, 128 GB data disk instance, running Ubuntu 24.04 LTS into acme project in eu-west-a zone.
data"kowabunga_zone" "eu-west-a" {
name ="eu-west-a"}
resource"kowabunga_kompute" "server" {
project =kowabunga_project.acme.id name ="acme-server" disk =64 extra_disk =128 mem =16 vcpus =8 zone =data.kowabunga_zone.eu-west-a.id template ="ubuntu-cloudimg-generic-24.04"}
Once created, subscribed users will get notified by email about Kompute instance details (such as private IP address, initial bootstrap admin credentials …).
DNS Record Association
Any newly created Kompute instance will automatically be added into region-local Kiwi DNS server. This way, any query to its hostname (acme-server in the previous example) will be answered.
Alternatively, you may also be willing to create custom one, for example, as aliases.
Let’s suppose you’d like to have previously created instance to be Active-Directory controller, and expose itself as ad.acme.local from a DNS perspective. This can be easily done through:
Note that it is possible to set more than one IP address. If so, the Kiwi DNS server will provide all results, to be used as client prefers (usually round-robin policy).
5.2.3 - Konvey NLB
Kowabunga Network Load-Balancer
Konvey is a plain simple network Layer-4 (UDP/TCP) load-balancer.
It’s only goal is to accept remote traffic and ship it back to one of the many application backend, through round-robin algorithm (with health check support).
Konvey can either be used to:
load-balance traffic from private network to private network
load-balance traffic from public network (i.e. Internet) to private network, in association with Kawaii. In such a scenario, Kawaii holds public IP address exposure, and route public traffic to Konvey instances, through NAT settings.
As with Kawaii, Konvey uses Kowabunga’s concept of Multi-Zone Resources (MZR) to ensure that, when the requested region features multiple availability zones, a project’s Konvey instance gets created in each zone, making it highly resilient.
Warning
Being a layer-4 network load-balancer, Konvey will passthrough any SSL/TLS traffic to configured backend. No traffic inspection is ever performed.
Resource Creation
As a projectAdmin user, one can create a Konvey load-balancer instance. Example below will spawn a load balancer named acme-lb in eu-west region for project acme, forwarding all TCP traffic received on port 443 to backend acme-server instance (on port 443 as well).
data"kowabunga_region" "eu-west" {
name ="eu-west"}
resource"kowabunga_konvey" "lb" {
name ="acme-lb" project =kowabunga_project.acme.id region =data.kowabunga_region.eu-west.id failover =true endpoints = [
{
name ="HTTPS" protocol ="tcp" port =443 backend_port =443 backend_ips = [kowabunga_kompute.server.ip]
}
]
}
Information
Arguably, having a load-balancer with a single backend is pretty useless in this example. One can obviously specify more than one backend IP addresses so effective round-robin dispatching will apply.
5.2.4 - Kylo NFS
Kowabunga Distributed Network File System
Kylo is Kowabunga’s incarnation of NFS. While all Kompute instances have their own local block-device storage disks, Kylo provides the capability to access a network storage, shared amongst virtual machines.
Kylo fully implements the NFSv4 protocol, making it easy for Linux instances (and even Windows) to mount it without any specific tools.
Under the hood, Kylo relies on underlying CephFS volume, exposed by Kaktus nodes, making it natively distributed and resilient (i.e. one doesn’t need trying to add HA on top).
Warning
Kylo access is restricted to project’s private network. While all your project’s instances can mount a Kylo endpoint, it can’t be reached from the outside.
Resource Creation
As a projectAdmin user, one can create a Kylo network file-system instance. Example below will spawn a instance named acme-nfs in eu-west region for project acme.
data"kowabunga_region" "eu-west" {
name ="eu-west"}
resource"kowabunga_kylo" "nfs" {
project =kowabunga_project.acme.id region =data.kowabunga_region.eu-west.id name ="acme-nfs" desc ="ACME NFS share"}
}
Information
Kylo features virtually unlimited storage. It can grow as big as your underlying Ceph cluster can.
6 - Customization
Welcome to your private Cloud !
Multiple options exist to further tune-in your Kowabunga setup.
6.1 - Cloud-Init bootstrap
Customize your private Cloud instances.
Cloud images are operating system templates and every instance starts out as an identical clone of every other instance. It is the user data that gives every cloud instance its personality and cloud-init is the tool that applies user data to your instances automatically.
Kowabunga Kahuna comes with pre-bundled cloud-init templates which are then deployed into /etc/kowabunga/templates configuration directory.
Supporting both Linux and Windows targets, they come with the usual:
meta_data.yml file, providing various metadata information, that can be further reused by Kowabunga agents.
network_config.yml file, allowing for proper automatic network stack and interfaces configuration.
user_data.yml file, providing a sequence of actions to be applied post (initial) boot, as described in its standard documentation.
Note that all these files are based on Go Templates. They are used by Kahuna to generate instance-specific configuration files and bundled into an ISO9660 image (stored on Ceph backend), ready to be consumed by OS, and written/updated each time a computing instance is being created/updated.
Warning
Kowabunga currently only provide admin-level cloud-init templating support. Templates are defined and maintained at admin level for the global platform. There’s no present way to fine-tune cloud-init templates per project, as override.
Linux Instances
Most of Linux distributions these days natively support cloud-init standard. As long as you’re virtual machines boots up with an associated emulated CD-ROM ISO9660 image aside, you’re good to go.
Note that Kowabunga cloud-init template natively provide the following post-actions:
Setup network interfaces, DNS and gateway.
Set instance hostname and FQDN.
Update package repositories.
Install basic packages, including QEMU agent.
Set initial root password.
Provision service user, ready to further bootstrap instance.
Adds a /usr/bin/kw-meta wrapper script, friendly use to Kowabunga instance metadata retrieval.
Wait for Internet connectivity/access.
Microsoft Windows Instances
Microsoft Windows OS is a different story than Linux as there’s no default cloud-init implementation bundled.
One can however cope with such limitation thanks to the Cloudbase-Init project which provide cloud-init compatibility and is the “The Quickest Way of Automating Windows Guest Initialization”. It supports Windows 8+ and Windows Server 2012+ OS variants.
Once your image has been built, Kowabunga cloudbase-init supports all options from the NoCloud engine.
Note that Kowabunga cloudbase-init template natively provide the following post-actions:
Setup network interfaces, DNS and gateway.
Set instance hostname and FQDN.
Install basic packages, including NuGet, Paket, PsExec, OpenSSH.
Set PowerShell as SSH default shell.
Update firewall rules.
Set OS password security policy.
Set initial root password.
Provision service user, ready to further bootstrap instance.
From there on, you’ll get a ready-to-be-consumed Windows instance, which deployment can be further automated thanks to Ansible over SSH or any other provisioning tool or scripts.
It is then your responsibility to provide the Microsoft Windows license key (your Windows instance will anyway automatically shutdown after an hour if not).
Warning
Note that it is possible to bypass the license verification mechanism. This is only valid if you intend to use your instance as a temporary sandbox for development/testing purpose. Microsoft Windows licenses are not that expensive and in no way does the Kowabunga project encourage piracy.
Shall you be willing to temporarily bypass such mechanism, you can do so with such an Ansible playbook for instance:
Kowabunga comes with bundled support for metrology and instrumentation. No one would ever deploy and maintain a blackbox infrastructure and support it empty handed.
If you’re SysAdmin (or DevOps, whatever the name now), and are willing care about monitoring, you’re got 2 options:
Use you’re already existing and in-place monitoring stack and tools.
Rely on Kowabunga-bundled ones.
In the second option, Kowabunga optionally comes bundled with:
Grafana, VictoriaMetrics and VictoriaLogs, hosted on Kahuna server, providing logs and metrics TimeSeries database storage and observability dashboards.
Grafana Alloy agent, hosted on Kahuna, Kiwi and Kaktus nodes, collecting data and streaming to Kahuna.
DNS Configuration
Let’s start by defining two new public endpoints for metrics and logs collection. We’ll expose them over HTTPS on Kahuna so that all infrastructure nodes will be shipping data to.
In our example, we’ll use metrics.acme.com and logs.acme.com as new receiving endpoint. Note that both endpoints will be filtered by HTTPS Basic Authentication so only genuine infrastructure nodes can push to. We’ll also be using grafana.acme.com as the monitoring instance. Please make sure to configure your DNS registrar accordingly (manually or through TF or such), so these subdomains match your Kahuna public IP address.
Client-Side Enablement
Next, we’ll extend our infrastructure’s declarations in Ansible. For that, we’ll:
globally enabled metrology capability.
enable agent’s deployment on all infrastructure instances.
declare the public metrics and logs receiving endpoints.
set secure credentials for client/server data shipment and collection.
As to do so, extend your platform’s ansible/inventories/group_vars/all/main.yml file with the following:
Once done, all your private instances should now have a running Grafana Alloy agent, collecting the various local metrics (CPU usage, memory, network, disk, libvirt, Ceph …) and associated logs an pushing them to Kahuna remote endpoint.
Server-Side Enablement
It’s now time to handle server-side counter part. Let’s enable these into Kahuna’s configuration by extending the ansible/inventories/group_vars/kahuna/main.yml file:
Note that in our example, we’ve limited metrics and logs retention server-side to 7 days. We’ll free to define different persistence duration that suits your needs.
kowabunga_metrology_dashboard_extra_users:
  - name: John Doe
    login: jdoe
    email: jdoe@acme.com
    password: A_STRONG_ONE
Again, apply for changes on all Kahuna instance:
$ kobra ansible deploy -p kowabunga.cloud.kahuna
Once done, Kahuna will then starts collecting data from all infrastructure node (push, not pull) and Grafana will be ready to be consumed.
Provisioning Grafana dashboards
This stage unfortunately cannot be automated at the moment ;-(
Kowabunga comes bundled with ready-to-be-consumed dashboards. They are maintained in a dedicated GitHub repository and, if you’re familiar with Grafana, can’t be simply copy/pasted or imported.
Once configured, Grafana will automatically pull for any changes (so you’re always up-to-date) and any edition you’d make would automatically trigger a pull-request on save.
Setup can be performed (manually only) through Administration / Provisioning menu, as detailed below:
You’ll need to first setup a GitHub Personal Access Token (or PAT) to Kowabunga’ repository (or yours, for convenience).
BREAKING CHANGE: update to new v0.50.0 API, major resources renaming: KGW to Kawaii, KFS to Kylo, KCE to Kompute, NetGW to Kiwi and Pool to StoragePool.
NEW: implemented database document migration helpers and per-collection schema versioning.
NEW: implemented new –migrate command-line flag to perform live MongoDB collections and documents migration.
NEW: restructured the whole source code tree.
NEW: server-side SDK is now directly built-in and auto-generated, instead of using external one, allows for easier development version pinning at engineering stage.
NEW: updated dependencies.
BUG: cloud-init: fix public network adapter gateway.
0.51.0 (2024-09-17)
NEW: extended common library with DownloadFromURL() method to efficiently retrieve remote files from HTTP.
NEW: extended agent library with ZSTD stream decompression routine.
NEW: extended agent library with QCOW2 image support and raw-format conversion.
NEW: extended ceph plugin to use new resource download framework and QCOW2 to RAW disk image conversion.
NEW: updated build and runtime dependancies.
0.50.6 (2024-09-13)
BUG: fix KGW NAT routing from private LAN traffic (network loop).
0.50.5 (2024-09-09)
NEW: add Makefile tests directive.
NEW: added new official infographics sources.
NEW: added tests for Konvey agent templating.
BUG: fix test-suite, now passes successfully.
BUG: fix konvey traefik configuration templating.
0.50.4 (2024-08-29)
NEW: extended Prometheus metrics with instance-based information.
NEW: Restored internal HAR (Highly Available Resource) support to create failover service instances.
NEW: Extended Zone and Regions internal APIs to guess for best-suited computing hosts.
NEW: Add kontrollers: a new type of built-in agent for as-a-service instances, replacing Ansible to auto-configure system apps based on instance metadata. Live service update is triggered through WebSocket RPC notification.
NEW: fully get rid of Ansible services post-provisionning.
NEW: KCE instances now supports more than 2 network interfaces.
NEW: Added new multi-zones-resource (MZR) meta-object for as-a-service instances spread over local zones for high-availability.
NEW: KGW now uses MZR resources to provide true cross-zones redundancy, with per-zone private and public gateways and cross-vnet peerings. Fully automated, cross-networks routing, traffic firewalling and forwarding, and public DNAT port-forwarding.
NEW: down-sized KGW hardware requirements.
NEW: KGW now uses dynamic instance metadata information for self-provisionning instead of static cloudinit ones
NEW: cloudinit metadata are now instructed with Kowabunga specifics
NEW: added built-in kw-meta Linux utility to retrieve dynamic instance metadata from API.
NEW: extended router header parsing for instance metadata API and improved query response times
NEW: reserve project-specific local gateway IP addresses.
NEW: add new runtime database schema migration and auto-pruner helpers.
NET: add routines to virtual network resources to find the most appropriate subnet, with enough room to host large services.
NEW: KNA agent now bypasses Iris middleware and used direct connection to Iris’ PowerDNS APIs.
NEW: project now provides list of VRRP IDs used by -as-a-service instances, not to be reused by end-user.
BUG: instance and KCE’s libvirt generated XML now ensures that network and disk interfaces are sorted in the right order and immutable.
BUG: more robust and resilient resources deletion in case of missing objects or cross-references.
0.30.0.0 (2024-05-07)
NEW: Stable v0.30 release
0.30.0.0-rc4 (2024-04-16)
BUG: fix pool object database value override at each scan period.
BUG: fix instance update and XML generation.
BUG: fix volume BSON parsing.
BUG: implemented API v0.31 changes; project volume creation depends on region, not zone.
BUG: drastically increase http/wsrpc timeout (support for large templates upload)
BUG: add fallback vlan gateway if no kgw in subnet
BUG: fix users assignment in groups.
BUG: move nfs ganesha api backends management from core to KSA agent.
BUG: kgw cloudinit now uses the right public gateway, not an hardcoded one.
NEW: updated dependancies.
0.30.0.0-rc3 (2024-04-10)
BUG: fix KCA memory calculation segv on some particular NUMA architectures.
BUG: updated dep to fix HTTP2 CVE
0.30.0.0-rc2 (2024-04-05)
BUG: fix some CI/CD build issues
BUG: force user password and API keys generation not to use symbols that might break stupid JSON/YAML parsers.
0.30.0.0-rc1 (2024-03-28)
BREAK: Major public API update
Migrated to OpenAPI v3.1.
Rely on brand new server-side SDK (every routing engine parts have been replaced).
Deprecation of storage pool types: local capability is gone, ceph becomes the only supported backend.
Update of template resources API, Ceph OS volumes are now automatically created from source HTTP(S) URL.
BREAK: Proper Multi-AZ service readiness
Storage Pools and NFS are now part of region, cross-zones, not zone-bounded anymore.
Virtual Networks and Subnets are now part of region, cross-zones, not zone-bounded anymore.
KFS and KGW as-as-sevices resources are now region-global, not zone-bounded anymore.
Resources from all zones should be able to use region’s global services.
BREAK: Revamped architecture
Introduction of n-tier architecture with Kowabunga Agents:
Kowabunga is now split between the global, Internet-exposed orchestrator, and datacenter-local agent (KCA, KNA, KSA) instances, managing private local resources. Agents connect to orchestrator through secure WebSocket (bypassing all possible private-DC firewall issues) and gets controlled by reverse-RPC calls.
Typical usage workflow translates as Terraform <-> Client SDK <-> API <-> Kowabunga Orchestrator <-> RPC <-> WSS <-> Local Agent.
Both agents and orchestrator auto-detects peer’s failure and automatically reconnect in a progressive manner.
All direct interaction from orchestrator to libvirt/Ceph/Iris is now delegated to respective agents.
Cloud-init ISO images are now stored on Ceph backend (distributed, ready for instances’ migration) and do not require a patched version of libvirt anymore.
The libvirt XML resource schema generation has been fully refactored.
Orchestrator now features a in-memory ultra-efficient database cache (zero-copy, no garbage collection)
NEW: Introduced user management features
Kowabunga now features users and groups of users.
Projects (and associated underlying resources) do not belong to anyone anymore and can only be created by users with superAdmin or projectAdmin role.
Users belong to one to several groups.
Projects are associated with groups.
All individuals from project’s groups are allowed to access and administrate project’s resources.
Orchestrator provides robust server-side generated API keys and user passwords, preventing user from using weak credentials
User are required to perform a 2-steps account validation upon creation, before being able to consume services.
NEW: Introduced robust authentication mechanisms
Kowabunga features 3 ways to consume WebServices:
admin master token (should never be used, unless for creating first superAdmin users)
Server-to-server API key authentication
JWT-based bearer authentication
Orchestrator’s HTTP router now features middleware-based API routing layers: log, authentication, authorization, processing
Orchestrator’s HTTP router uses per API route ACLs checks.
NEW: Miscellaneous features
New modular debian packaging, differentiating orchestrator from agents, with multi-architecture support (x86_64, arm64 …)
Enforced Go 1.22 compiler
Fixes all known CVEs (to date)
Modularized Go packages with dynamic plugin support
BUG: add missing project’s KGW listing API call prototype.
0.10.0.0
NEW: implemented project cost retrieval API
NEW: implemented instance remote connection URL retrieval API
NEW: implemented new special /latest/meta-data instance metadata API (AWS-style) to be queried by live instances to retrieve configuration properties
NEW: re-implemented cost management API implementation, every resources now has its own price, flagged in DB.
NEW: major DB queries optimization, fast and furious (should always have been done this way)
NEW: Introduced ansible vars to be injected in cloud init template
NEW: Implemented KGW (Kowabunga Network Gateway) object, a network gateway as-a-service, providing Internet inbound and outbound traffic to your project.
NEW: added support for pre-release binary vulnerability check (make vuln)
NEW: extended Spice’s virtual machine remote-display configuration to bind on all host interfaces
NEW: add support for Windows-OS virtual machines
BREAK: updated configuration file YAML syntax
0.7.8.1
BUG: fix API handler web services
0.7.8.0
NEW: expose Kowabunga metrics through native Prometheus format (/metrics endpoint)
NEW: new custom HTTP server implementation, allows for multiple custom endpoint handlers
BUG: cloud-init network config shuld not configure DNS settings if adapter doesn’t have any associated IP address.
0.7.7.0
NEW: implemented dns_record support from API v0.7.7
BUG: only add instance private IP addresses to the internal DNS record
0.7.6.7
BUG: fix possible ssh pubkey misformatting at cloud-init generation
0.7.6.6
BUG: fix infinite round up for max score calculation on x86_64 archs
0.7.6.5
BUG: extra sanity checks on host
0.7.6.4
BUG: fix subnet’s reserved range model generation
0.7.6.3
NEW: improved host instance election algorithm
BUG: prevent some possible nil pointer de-referencing
BUG: fix multi-hosts spreading, ensuring local pool access is done from the host it belongs to
0.7.6.2
fix deb scripts
0.7.6.1
pre/post tasks on Debian packaging
0.7.6
server-side implementation of Kowabunga API v0.7.6
0.1
initial release
8 - Developers Corner
Learn how to contribute to Kowabunga
8.1 - Contributing
Learn how to controbute to Kowabunga
Kowabunga API
It’s all about API ;-)
Kowabunga implements a full OpenAPI v3 compliant API.
Starting you journey with Kowabunga an extending its capabilities and features take its roots in API definition
Our API build tools rely on some heavily tuned Jinja macros to factorize code as much as can be.
While we try to keep as much compatibility as can be, Kowabunga’s API is not yet frozen (and won’t before reaching 1.0 stage) and can still evolve. Our API is designed to be self-consumed by the Kahuna server and all code-generated SDK libaries.
Orchestrator and Agents
Server-side and standalone agents (Kiwi, Kaktus but also service ones, like Kawaii, Konvey and others …) are all managed in a single source repository.
They are build with love in Go programming language.
Linux Requirements
On Ubuntu 24.04, you fundamentaly need Ceph librairies (Rados/RBD):
Our WebUI, Koala is made with Angular and actively looking for contributors and maintainers ;-)
Kowabunga’s purpose being to enforce automation-as-code and configuration-as-code, Koala is designed to be user-facing, yet read-only.
8.2 - SDK
Use our SDKs and IAC tools to connect to Kowabunga
Kowabunga comes with various ready-to-be consumed SDKs. If you’re a developer and want to interface with Kowabunga services, making REST API calls is great but using a prebuilt library for your programming language of choice is always better.
It helps you deploy and maintain your Kowabunga infrastructure thanks to pre-built roles and playbooks and consume Kowabunga’s API to manage its services.
Hope is not a strategy; wish for the best, but prepare for the worst.
We’re working hard to make Kowabunga as resilient and fault-tolerant as possible but human nature will always prevail. There’s always going to be one point in time where your database will get corrupted, when you’ll face a major power-supply incident, when you’ll have to bring everything back from ashes, in a timely manner …
Breath up, let’s see how we can help !
9.1 - Ceph
Troubleshooting Ceph storage
Kaktus HCI nodes rely on Ceph for underlying distributed storage.
Ceph provides both:
RBD block-device images for Kompute virtual instances
Ceph is awesome. Ceph is fault-tolerant. Ceph hashes your file objects into thousands of pieces, distributed and replicated over dozens if not hundreds of SSDs on countless machines. And yet, Ceph sometimes crashes or fails to recover (even though it has incredible self healing capabilities).
While Ceph perfectly survives some occasional nodes failure, have a try when you have a complete network or power-supply outage in your region, and you’ll figure it out ;-)
So let’s so how we can restore Ceph cluster.
Unable to start OSDs
If Ceph OSDs can’t be started, it is likely because of un-detected (and un-mounted) LVM partition.
A proper mount command should provide the following:
$ mount | grep /var/lib/ceph/osd
tmpfs on /var/lib/ceph/osd/ceph-0 type tmpfs (rw,relatime,inode64)tmpfs on /var/lib/ceph/osd/ceph-2 type tmpfs (rw,relatime,inode64)tmpfs on /var/lib/ceph/osd/ceph-1 type tmpfs (rw,relatime,inode64)tmpfs on /var/lib/ceph/osd/ceph-3 type tmpfs (rw,relatime,inode64)
If not, that means that /var/lib/ceph/osd/ceph-X directories are empty and OSD can’t run.
Run the following command to re-scan all LVM partitions, remount and start OSDs.
$ sudo ceph-volume lvm activate --all
Check for mount output (and/or re-run command) until all target disks are mounted.
Fix damaged filesystem and PGs
In case of health error and damaged filesystem/PGs, one can easily fix those:
$ ceph status

  cluster:
    id:     be45512f-8002-438a-bf12-6cbc52e317ff
    health: HEALTH_ERR
            25934 scrub errors
            Possible data damage: 7 pgs inconsistent
Isolate the damaged PGs:
$ ceph health detail
HEALTH_ERR 25934 scrub errors; Possible data damage: 7 pgs inconsistent
[ERR] OSD_SCRUB_ERRORS: 25934 scrub errors
[ERR] PG_DAMAGED: Possible data damage: 7 pgs inconsistent
    pg 2.16 is active+clean+scrubbing+deep+inconsistent+repair, acting [5,11]
    pg 5.20 is active+clean+scrubbing+deep+inconsistent+repair, acting [8,4]
    pg 5.26 is active+clean+scrubbing+deep+inconsistent+repair, acting [11,3]
    pg 5.47 is active+clean+scrubbing+deep+inconsistent+repair, acting [2,9]
    pg 5.62 is active+clean+scrubbing+deep+inconsistent+repair, acting [8,1]
    pg 5.70 is active+clean+scrubbing+deep+inconsistent+repair, acting [11,2]
    pg 5.7f is active+clean+scrubbing+deep+inconsistent+repair, acting [5,3]
Proceed with PG repair (iterate on all inconsistent PGs):
$ ceph pg repair 2.16
and wait until everything’s fixed.
$ ceph status
  cluster:
    id:     be45512f-8002-438a-bf12-6cbc52e317ff
    health: HEALTH_OK
MDS daemon crashloop
If your Ceph MDS daemon (i.e. CephFS) is in a crashloop, probably because of corrupted journal, let’s see how we can proceed:
Get State
Check for global CephFs status, including clients list, number of active MDS servers etc …
$ ceph fs status
Additionally, you can get a dump of all filesystem, trying to find MDS daemons’ status (laggy, replay …):
$ ceph fs dump
Prevent client connections
If you suspect the filesystem’s to be damaged, first thing to do is to preserve any more corruption.
Start by stopping all CephFs clients, if under control.
For Kowabunga, that means stopping NFS Ganesha server on all Kaktus instances:
$ sudo systemctl stop nfs-ganesha
Prevent all client connections from server-side (i.e. Kaktus).
We consider that filesystem name is nfs:
$ ceph config set mds mds_deny_all_reconnect true$ ceph config set mds mds_heartbeat_grace 3600$ ceph fs set nfs max_mds 1$ ceph fs set nfs refuse_client_session true$ ceph fs set nfs down true
Stop server-side MDS instances on all Kaktus servers: