This is the multi-page printable view of this section. Click here to print.

Return to the regular view of this page.

Getting Started

Deploy your first Kowabunga instance !

1 - Hardware Requirements

Prepare hardware for setup

Setting up a Kowabunga platform requires you to provide the following hardware:

  • 1x Kahuna instance (more could used if high-availability is expected).
  • 1x Kiwi instance per-region (2x recommended for production-grade)
  • 1x Kaktus instance per-region (a minimum of 3x recommended for production-grade, can scale to N).

Kahuna Instance

Kahuna is the only instance that will be exposed to end users. It is recommended to have it exposed on public Internet, making it easier for DevOps and users to access to but there’s no strong requirement for that. It is fairly possible to keep it local to your private corporate network, only accessible from on-premises network or through VPN.

Hardware requirements are lightweight:

  • 2-cores vCPUs
  • 4 to 8 GB RAM
  • 64 GB for OS + MongoDB database.

Disk and network performance is fairly insignificant here, anything modern will do just fine.

We personnally use and recommend using small VPS-like public Cloud instances. They come with public IPv4 address and all that one needs for a monthly price of $5 to $20 only.

Kiwi Instance

Kiwi will act as a network software router and gateway. Even more than for Kahuna, you don’t need much horse-power here. If you plan on setting your own home labs, a small 2 GB RAM Raspberry Pi would be sufficient (keep in mind that SoHo routers and gateways are lightweight than that).

If you intend to use it for enteprise-grade purpose, just pick the lowest end server you could fine.

It’s probably going to come bundled with 4-cores CPU, 8 GB of RAM and whatever SSD and in any cases, it would be more than necessary, unless you really intend to handle 1000+ computing nodes being a multi-Gbps traffic.

Kaktus Instance

Kaktus instance are another story. If there’s one place you need to put your money on, here would be the place. The instance will handle as many virtual machines as can be and be part of the distributed Ceph storage cluster.

Sizing depends on your expected workload, there’s no accurate rule of thumb for that. You’ll need to think capacity planning ahead. How much vCPUs do you expect to run in total ? How many GBs of RAM ? How much disk ? What overcommit ratio do you expect to set ? How much data replication (and so … resilience) do you expect ?

These are all good questions to be asked. Note that you can easily start low with only a few Kaktus instances and scale up later on, as you grow. The various Kaktus instances from your fleet may also be heterogeneous (to some extent).

As a rule of thumb, unless you’re doing setting up a sandbox or home lab, a minimum of 3 Kaktus instance would be recommended. This allows you to move workload from one to another, or simply put one in maintenance mode (i.e. shutdown workload) while keeping business continuity.

Supposing you have X Kaktus instances and expect up to Y to be down at a given time, the following applies:

Instance Maximum Workload: (X - Y) / X %

Said differently, with only 3 machines, don’t go above 66% average load usage or you won’t be able to put one in maintenance without tearing down application.

Consequently, with availability in mind, better have more lightweight instances than few heavy ones.

Same applies (even more to Ceph storage cluster). Each instance local disk will be part of Ceph cluster (a Ceph OSD to be accurate) and data will be spread across those, from the same region.

Now, let’s consider you want to achieve 128 TB usable disk space. At first, you need to define your replication ratio (i.e. how many time objects storage fragments will be replicated across disks). We recommend a minimum of 2, and 3 for production-grade workloads. That means you’ll actually need a total of 384 TB of physical disks.

Here are different options to achieve it:

  • 1 server with 24x 16TB SSDs each
  • 3 servers with 8x 16TB SSDs each
  • 3 servers with 16x 8TB SSDs each
  • 8 servers with 6x 8TB SSDs each
  • […]

From a purely resilient perspective, last option would be the best. It provides the more machines, with the more disks, meaning that if anything happens, the smallest fraction of data from the cluster will be lost. Lost data is possibly only ephemeral (time for server or disk to be brought up again). But while down, Ceph will try to re-copy data from duplicated fragments to other disks, inducing a major private network bandwidth usage. Now whether you only have 8 TB of data to be recovered or 128 TB may have a very different impact.

Also, as your virtual machines performance will be heavily tight to underlying network storage, it is vital (at least for production-grade workloads) to use NVMe SSDs with 10 to 25 Gbps network controllers and sub-millisecond latency between your private region servers.

So let’s recap …

Typical Kaktus instances for home labs or sandbox environments would look like:

  • 4-cores (8-threads) CPUs.
  • 16 GB RAM.
  • 2x 1TB SATA or NVMe SSDs (shared between OS partition and Ceph ones)
  • 1 Gbps NIC

While Kaktus instances for production-grade workload could easily look like:

  • 32 to 128 cores CPUs.
  • 128 GB to 1.5 TB RAM.
  • 2x 256 GB SATA RAID-1 SSDs for OS.
  • 6 to 12x 2-8 TB NVMe SSDs for Ceph.
  • 10 to 25 Gbps NICs with link-agregation.

2 - Software Requirements

Get your toolchain ready

Kowabunga’s deployment philosophy relies on IaC (Infrastructure-as-Code) and CasC (Configuration-as-Code). We heavily rely on:

Kobra Toolchain

While natively compatible with the aformentionned, we recommend using Kowabunga Kobra as a toolchain overlay.

Kobra is a DevOps deployment swiss-army knife utility. It provides a convenient wrapper over OpenTofu, Ansible and Helmfile with proper secrets management, removing the hassle of complex deployment startegy.

Anything can be done without Kobra, but it makes things simpler, not having to care about the gory details.

Kobra supports various secret management providers. Please choose that fits your expected collaborative work experience.

At runtime, it’ll also make sure you’re OpenTofu / Ansible toolchain is properly set on your computer, and will do so otherwise (i.e. brainless setup).

Installation can be easily performed on various targets:

Installation Ubuntu Linux

Register Kowabunga APT repository and then simply:

$ sudo apt-get install kobra

Installation on macOS

macOS can install Kobra through Homebrew. Simply do:

$ brew tap kowabunga/cloud https://github.com/kowabunga-cloud/homebrew-tap.git
$ brew update
$ brew install kobra

Manual Installation

Kobra can be manually installed through released binaries.

Just download and extract the tarball for your target.

Setup Git Repository

Kowabunga comes with a ready-to-consumed platform template. One can clone it from Git through:

$ git clone https://github.com/kowabunga-cloud/platform-template.git

or better, fork it in your own account, as a boostraping template repository.

Secrets Management

Passwords, API keys, tokens … they are all sensitive and meant to be secrets. You don’t want any of those to leak on a public Git repository. Kobra relies on SOPS to ensure all secrets are located in an encrypted file (which is safe to to be Git hosted), which can be encrypted/decrypted on the fly thanks to a master key.

Kobra supports various key providers:

  • aws: AWS Secrets Manager
  • env: Environment variable stored master-key
  • file: local plain text master-key file (not recommended for production)
  • hcp: Hashicorp Vault
  • input: interactive command-line input prompt for master-key
  • keyring: local OS keyring (macOS Keychain, Windows Credentials Manager, Linux Gnome Keyring/KWallet)

If you’re building a large production-grade system, with multiple contributors and admins, using a shared key management system like aws or hcp is probably welcome.

If you’re single contributor or in a very small team, storing your master encryption key in your local keyring will do just fine.

Simply edit your kobra.yml file in the following section:

secrets:
  provider: string                    # aws, env, file, hcp, input, keyring
  aws:                                # optional, aws-provider specific
    region: string
    role_arn: string
    id: string
  env:                                # optional, env-provider specific
    var: string                       # optional, defaults to KOBRA_MASTER_KEY
  file:                               # optional, file-provider specific
    path: string
  hcp:                                # optional, hcp-provider specific
    endpoint: string                  # optional, default to "http://127.0.0.1:8200" if unspecified
  master_key_id: string

As an example, managing platform’s master key through your system’s keyring is as simple as:

secrets:
  provider: keyring
  master_key_id: my-kowabunga-labs

As a one-time thing, let’s init our new SOPS key pair.

$ kobra secrets init
[INFO 00001] Issuing new private/public master key ...
[INFO 00002] New SOPS private/public key pair has been successuflly generated and stored

Ansible

The official Kowabunga Ansible Collection and its associated documentation will seamlessly integrate with SOPS for secrets management.

Thanks to that, any file from your inventory’s host_vars or group_vars directories, being suffixed as .sops.yml will automatically be included when running playbooks. It is then absolutely safe for you to use these encrypted-at-rest files to store your most sensitive variables.

Creating such files and/or editing these to add extra variables is then as easy as:

$ kobra secrets edit ansible/inventories/group_vars/all.sops.yml

Kobra will automatically decrypt the file in-live, open the editor of your choice (as stated in your $EDITOR env var), and re-ecnrypt it with the master key at save/exit.

That’s it, you’ll never have to worry about secrets management and encryption any longer !

OpenTofu

The very same applies for OpenTofu, where SOPS master key is used to encrypt the most sensitive data. Anything sensitive you’d need to add to your TF configuration can be set in the terraform/secrets.yml file as simple key/value.

$ kobra secrets edit terraform/secrets.yml

Note however that their existence must be manually reflected into HCL formatted terraform/secrets.tf file, e.g.:

locals {
  secrets = {
    my_service_api_token = data.sops_file.secrets.data.my_service_api_token
  }
}

supposing that you have an encrypted my_service_api_token: ABCD…Z entry in your terraform/secrets.yml file.

Note that OpenTofu adds a very strong feature over plain old Terraform, being TF state file encryption. Where the TF state file is located (local, i.e. Git or remotely, S3 or alike) is up to you, but shall you use a Git located one, we strongly advise to have it encrypted.

You can achieve this easily by extending the terraform/providers.tf file in your platform’s repository:

terraform {
  encryption {
    key_provider "pbkdf2" "passphrase" {
      passphrase = var.passphrase
    }

    method "aes_gcm" "sops" {
      keys = key_provider.pbkdf2.passphrase
    }
    state {
      method = method.aes_gcm.sops
    }

    plan {
      method = method.aes_gcm.sops
    }
  }
}

variable "passphrase" {
  # Value to be defined in your local passphrase.auto.tfvars file.
  # Content to be retrieved from decyphered secrets.yml file.
  sensitive = true
}

Then, create a local terraform/passphrase.auto.tfvars file with the secret of your choice:

passphrase = "ABCD...Z"

3 - Network Topology

Our Tutorial network topology

Let’s use this sample network topology for the rest of this tutorial:

Network Topology

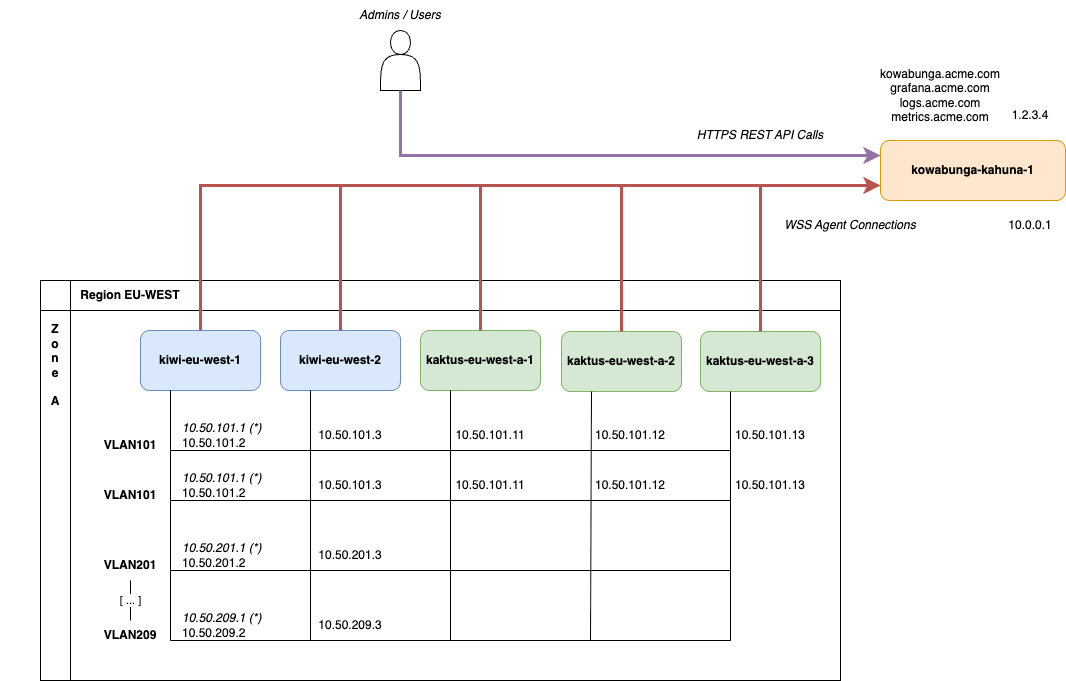
We’ll start with a single Kahuna instance, with public Internet exposure. The instance’s hostname will be kowabunga-kahuna-1 and it has 2 network adapters and associated IP addresses:

  • a private one, 10.0.0.1, in the event we’d need to peer further one with other instances for hugh-availability.
  • a public one, 1.2.3.4, exposed as kowabunga.acme.com for WebUI, REST API calls to the orchestrator and WebSocket agents endpoint. It’ll also be exposed as grafana.acme.com, logs.acme.com and metrics.acme.com for Kiwi and Kaktus to push logs and and metrics and allow for service’s metrology.

Next is the main (and only) region, EU-WEST and its single zone, EU-WEST-A. The region/zone will feature 2 Kiwi instances and 3 Kaktus ones.

All instances will be connected under the same L2 network layer (as defined in requirements) and we’ll use different VLANs and associated network subnets to isolate content:

  • VLAN101 will be used as default, administration VLAN, with associated 10.50.101.0/24 subnet. All Kiwi and Kaktus instances will be part of.
  • VLAN102 will be used for Ceph backpanel, with associated 10.50.102.0/24 subnet. While not mandatory, this allows differentiating the administrative control plane traffic from pure storage cluster data synchronization. This allows for better traffic shaping and monitoring, if ever needs be. Note that on enterprise-grade production systems, Ceph project would recommend to use dedicated NIC for Ceph traffic, so isolation here makes sense.
  • VLAN201 to VLAN209 would be application VLANs. Kiwi will bind them, being region’s router, but Kaktus don’t. Instantiated VMs will however, through bridged network adapters.

4 - Setup Kahuna

Let’s start with the orchestration core

Now let’s suppose that you’ve cloned the Git platform repository template and that your Kahuna instance server has been provisioned with latest Ubuntu LTS distribution. Be sure that it is SSH-accessible with some local user.

Let’s take the following assumptions for the rest of this tutorial:

  • We only have one single Kahuna instance (no high-availability).
  • Local bootstrap user with sudo privileges is ubuntu, with key-based SSH authentication.
  • Kahuna instance is public-Internet exposed through IP address 1.2.3.4, translated to kowabunga.acme.com DNS.
  • Kahuna instance is private-network exposed through IP address 10.0.0.1.
  • Kahuna instance hostname is kowabunga-kahuna-1.

Setup DNS

Please ensure that your kowabunga.acme.com domain translates to public IP address 1.2.3.4. Configuration is up to you and your DNS provider and can be done manually.

Being IaC-supporters, we advise using OpenTofu for that purpose. Let’s see how we can do, using Cloudflare DNS provider.

Start by editing the terraform/providers.tf file in your platform’s repository:

terraform {
  required_providers {
    cloudflare = {
      source  = "cloudflare/cloudflare"
      version = "~> 5"
    }
  }
}

provider "cloudflare" {
  api_token = local.secrets.cloudflare_api_token
}

extend the terraform/secrets.tf file with:

locals {
  secrets = {
    cloudflare_api_token = data.sops_file.secrets.data.cloudflare_api_token
  }
}

and add the associated:

cloudflare_api_token: MY_PREVIOUSLY_GENERATED_API_TOKEN

variable in terraform/secrets.yml file thanks to:

$ kobra secrets edit terraform/secrets.yml

Then, simply edit your terraform/main.tf file with the following:

resource "cloudflare_dns_record" "kowabunga" {
  zone_id = "ACME_COM_ZONE_ID"
  name    = "kowabunga"
  ttl     = 3600
  type    = "A"
  content = "1.2.3.4"
  proxied = false
}

initialize OpenTofu (once, or each time you add a new provider):

$ kobra tf init

and apply infrastructure changes:

$ kobra tf apply

Inventory Management

It is now time to declare your Kahuna instance in Ansible’s inventory. Simply extend the ansible/inventories/hosts.txt the following way:

[kahuna]
10.0.0.1 name=kowabunga-kahuna-1 ansible_ssh_user=ubuntu

The instance is now declared to be part of kahuna group and Ansible will use ubuntu local user account to connect through SSH.

Note that doing so, you can now safely:

  • declare host-specific variables in ansible/host_vars/10.0.0.1.yml file.
  • declare host-specific sensitive variables in ansible/host_vars/10.0.0.1.sops.yml file.
  • declare kahuna group-specific variables in ansible/group_vars/kahuna/main.yml file.
  • declare kahuna group-specific sensitive variables in ansible/group_vars/kahuna.sops.yml file.
  • declare any other global variables in ansible/group_vars/all/main.yml file.
  • declare any other global sensitive variables in ansible/group_vars/all.sops.yml file.

Note that Ansible variables precedence will apply:

role defaults < all vars < group vars < host vars < role vars

Ansible Kowabunga Collection

Kowabunga comes with an official Ansible Collection and its associated documentation.

The collection contains:

  • roles and playbooks to easily deploy the various Kahuna, Koala, Kiwi and Kaktus instances.
  • actions so you can create your own tasks to interact and manage a previously setup Kowabunga instance.

Check out ansible/requirements.yml file to declare the specific collection version you’d like to use:

---
collections:
  - name: kowabunga.cloud
    version: 0.0.1

By default, your platform is configured to pull a tagged official release from Ansible Galaxy. You may however prefer to pull it directly from Git, using latest commit for instance. This can be accomodated through:

---
collections:
  - name: git@github.com:kowabunga-cloud/ansible-collections-kowabunga
    type: git
    version: master

Once defined, simply pull it into your local machine:

$ kobra ansible pull

Kahuna Settings

Kahuna instance deployment will take care of everything. It’ll take the assumption of running a supported Ubuntu LTS release, enforce some configuration and security settings, install the necessary packages, create local admin user accounts, if required, and setup some form of deny-all filtering policy firewall, so you’re safely exposed.

Admin Accounts

Let’s start by declaring some user admin accounts we’d like to create. We don’t want to keep on using the single nominative ubuntu account for everyone after all.

Simply create/edit the ansible/inventories/group_vars/all/main.yml file the following way:

kowabunga_os_user_admin_accounts_enabled:
  - admin_user_1
  - admin_user_2

kowabunga_os_user_admin_accounts_pubkey_dirs:
  - "{{ playbook_dir }}/../../../../../files/pubkeys"

to declare all your expected admin users, and add their respective SSH public key files in the ansible/files/pubkeys directory, e.g.:

$ tree ansible/files/pubkeys/
ansible/files/pubkeys/
└── admin_user_1
└── admin_user_2

We’d also recommend you to set/update the root account password. By default, Ubuntu comes without any, making it impossible to login. Kowabunga’s playbook make sure that root login is prohibited from SSH for security reasons (e.g. brute-force attacks) but we encourage you setting one, as it’s always useful, especially on public cloud VPS or bare metal servers to get a console/IPMI access to log into.

If you intend to do so, simply edit the secrets file:

$ kobra secrets edit ansible/inventories/group_vars/all.sops.yml

and set the requested password:

secret_kowabunga_os_user_root_password: MY_SUPER_SETRONG_PASSWORD

Firewall

If you Kahuna instance is connected on public Internet, it is more than recommended to enable a network firewall. This can be easily done by extending the ansible/inventories/group_vars/kahuna/main.yml file with:

kowabunga_firewall_enabled: true
kowabunga_firewall_open_tcp_ports:
  - 22
  - 80
  - 443

Note that we’re limited opened ports to SSH and HTTP/HTTPS here, which should be more than enough (HTTP is only used by Caddy server for certificate auto-renewal and will redirect traffic to HTTPS anyway). If you don’t expect your instance to be SSH-accessible on public Internet, you can safely drop this line.

MongoDB

Kahuna comes with a bundled, ready-to-be-used MongoDB deployment. This comes in handy if you only have a unique instance to manage. This remains however optional (default), as you may very well be willing to re-use an existing external production-grade MongoDB cluster, already deployed.

If you intend to go with the bundled one, a few settings must be configured in ansible/inventories/group_vars/kahuna/main.yml file:

kowabunga_mongodb_enabled: true
kowabunga_mongodb_listen_addr: "127.0.0.1,10.0.0.1"
kowabunga_mongodb_rs_key: "{{ secret_kowabunga_mongodb_rs_key }}"
kowabunga_mongodb_rs_name: kowabunga
kowabunga_mongodb_admin_password: "{{ secret_kowabunga_mongodb_admin_password }}"
kowabunga_mongodb_users:
  - base: kowabunga
    username: kowabunga
    password: '{{ secret_kowabunga_mongodb_user_password }}'
    readWrite: true

and their associated secrets in ansible/inventories/group_vars/kahuna.sops.yml

secret_kowabunga_mongodb_rs_key: YOUR_CUSTOM_REPLICA_SET_KEY
secret_kowabunga_mongodb_admin_password: A_STRONG_ADMIN_PASSWORD
secret_kowabunga_mongodb_user_password: A_STRONG_USER_PASSWORD

This will basically instruct Ansible to install MongoDB server, configure it with a replicaset (so it can be part of a future cluster instance, we never know), secure it with admin credentials of your choice and create a kowabunga database/collection and associated service user.

Kahuna Settings

Finally, let’s ensure the Kahuna orchestrator gets everything he needs to operate.

You’ll need to define:

  • a custom email address (and associated SMTP connection settings) for Kahuna to be able to send email notifications to users.
  • a randomly generated key to sign JWT tokens (please ensure it is secure enough, not to compromise issued tokens robustness).
  • a randomly generated admin API key. It’ll be used to provision the admin bits of Kowabunga, until proper user accounts have been created.
  • a private/public SSH key-pair to be used by platform admins to seamlessly SSH into instantiated Kompute instances. Please ensure that the private key is being stored securely somewhere.

Then simply edit the ansible/inventories/group_vars/kahuna/main.yml file the following way:

kowabunga_public_url: "https://kowabunga.acme.com"

kowabunga_kahuna_http_address: "10.0.0.1"
kowabunga_kahuna_admin_email: kowabunga@acme.com
kowabunga_kahuna_jwt_signature: "{{ secret_kowabunga_kahuna_jwt_signature }}"
kowabunga_kahuna_db_uri: "mongodb://kowabunga:{{ secret_kowabunga_mongodb_user_password }}@10.0.0.1:{{ mongodb_port }}/kowabunga?authSource=kowabunga"
kowabunga_kahuna_api_key: "{{ secret_kowabunga_kahuna_api_key }}"

kowabunga_kahuna_bootstrap_user: kowabunga
kowabunga_kahuna_bootstrap_pubkey: "YOUR_ADMIN_SSH_PUB_KEY"

kowabunga_kahuna_smtp_host: "smtp.acme.com"
kowabunga_kahuna_smtp_port: 587
kowabunga_kahuna_smtp_from: "Kowabunga <{{ kowabunga_kahuna_admin_email }}>"
kowabunga_kahuna_smtp_username: johndoe
kowabunga_kahuna_smtp_password: "{{ secret_kowabunga_kahuna_smtp_password }}"

and add the respective secrets into ansible/inventories/group_vars/kahuna.sops.yml:

secret_kowabunga_kahuna_jwt_signature: A_STRONG_JWT_SGINATURE
secret_kowabunga_kahuna_api_key: A_STRONG_API_KEY
secret_kowabunga_kahuna_smtp_password: A_STRONG_PASSWORD

Ansible Deployment

We’re done with configuration (finally) ! All we need to do now is finally run Ansible to make things live. This is done by invoking the kahuna playbook from the kowabunga.cloud collection:

$ kobra ansible deploy -p kowabunga.cloud.kahuna

Note that, under-the-hood, Ansible will use Ansible Mitogen extension to speed things up. Bear in mind that Ansible’s run is idempotent. Anything’s failing can be re-executed. You can also run it as many times you want, or re-run it in the next 6 months or so, provided you’re using a tagged collection, the end result will always be the same.

After a few minutes, if everything’s went okay, you should have a working Kahuna instance, i.e.:

  • A Caddy frontal reverse-proxy, taking care of automatic TLS certificate issuance, renewal and traffic termination, forwarding requests back to either Koala Web application or Kahuna backend server.
  • The Kahuna backend server itself, our core orchestrator.
  • Optionally, MongoDB database.

We’re now ready for provisionning users and teams !

5 - Provisioning Users

Let’s populate admin users and teams

Your Kahuna instance is now up and running, let’s get things and create a few admin users accounts. At first, we only have the super-admin API key that was previously set through Ansible deployment. We’ll make use of it to provision further users and associated teams. After all, we want a nominative user acount for each contributor, right ?

Back to TF config, let’s edit the terraform/providers.tf file:

terraform {
  required_providers {
    kowabunga = {
      source  = "kowabunga-cloud/kowabunga"
      version = ">=0.55.0"
    }
  }
}

provider "kowabunga" {
  uri   = "https://kowabunga.acme.com"
  token = local.secrets.kowabunga_admin_api_key
}

Make sure to edit the Kowabunga provider’s uri with the associated DNS of your freshly deployed Kahuna instance and edit the terraform/secrets.yml file so match the kowabunga_admin_api_key you’ve picked before. OpenTofu will make use of these parameters to connect to your private Kahuna and apply for resources.

Now declare a few users in your terraform/locals.tf file:

locals {
  admins = {
    // HUMANS
    "John Doe" = {
      email  = "john@acme.com",
      role   = "superAdmin",
      notify = true,
    }
    "Jane Doe" = {
      email  = "jane@acme.com",
      role   = "superAdmin",
      notify = true,
    }

    // BOTS
    "Admin TF Bot" = {
      email = "tf@acme.com",
      role  = "superAdmin",
      bot   = true,
    }
  }
}

and the following resources definition in terraform/main.tf:

resource "kowabunga_user" "admins" {
  for_each      = local.admins
  name          = each.key
  email         = each.value.email
  role          = each.value.role
  notifications = try(each.value.notify, false)
  bot           = try(each.value.bot, false)
}

resource "kowabunga_team" "admin" {
  name  = "admin"
  desc  = "Kowabunga Admins"
  users = sort([for key, user in local.admins : kowabunga_user.users[key].id])
}

Then, simply apply for resources creation:

$ kobra tf apply

What we’ve done here was to register a new admin team, with 3 new associated user accounts: 2 regular ones for human administrators and one bot, which you’ll be able to use its API key instead of the super-admin master one to further provision resources if you’d like.

Better do this way as, shall the key be compromised, you’ll only have to revoke it or destroy the bot account, instead of replacing the master one on Kahuna instance.

Newly registered user will be prompted with 2 emails from Kahuna:

  • a “Welcome to Kowabunga !” one, simply asking yourself to confirm your account’s creation.
  • a “Forgot about your Kowabunga password ?” one, prompting for a password reset.

Once users have been registered and password generated, and provided Koala Web application has been deployed as well, they can connect to (and land on a perfectly empty and so useless dashboard ;-) for now at least ).

Let’s move on and start creating our first region !

6 - Create Your First Region

Let’s setup a new region and its Kiwi and Kaktus instances

Orchestrator being ready, we can now boostrap our first region.

Let’s take the following assumptions for the rest of this tutorial:

  • The Kowabunga region is to be called eu-west.
  • The region will have a single zone named eu-west-a.
  • It’ll feature 2 Kiwi and 3 Kaktus instances.

Back on the TF configuration, let’s use the following:

locals {
  eu-west = {
    desc = "Europe West"

    zones = {
      "eu-west-a" = {
        id = "A"
      }
    }
  }
}

resource "kowabunga_region" "eu-west" {
  name = "eu-west"
  desc = local.eu-west.desc
}

resource "kowabunga_zone" "eu-west" {
  for_each = local.eu-west.zones
  region   = kowabunga_region.eu-west.id
  name     = each.key
  desc     = "${local.eu-west.desc} - Zone ${each.value.id}"
}

And apply:

$ kobra tf apply

Nothing really complex here to be fair, we’re just using Kahuna’s API to register the region and its associated zone.

Now, we’ll register the 2 Kiwi instances and 3 Kaktus ones. Please note that:

  • we’ll extend the TF locals definition for that.
  • Kiwi is to be associated to the global region.
  • while Kaktus is ti be associated to the region’s zone.

Let’s start by registering one Kiwi and 2 associated agents:

locals {
  eu-west = {

    agents = {
      "kiwi-eu-west-1" = {
        desc = "Kiwi EU-WEST-1 Agent"
        type = "Kiwi"
      }
      "kiwi-eu-west-2" = {
        desc = "Kiwi EU-WEST-2 Agent"
        type = "Kiwi"
      }
    }

    kiwi = {
      "kiwi-eu-west" = {
        desc   = "Kiwi EU-WEST",
        agents = ["kiwi-eu-west-1", "kiwi-eu-west-2"]
      }
    }
  }
}

resource "kowabunga_agent" "eu-west" {
  for_each = merge(local.eu-west.agents)
  name     = each.key
  desc     = "${local.eu-west.desc} - ${each.value.desc}"
  type     = each.value.type
}

resource "kowabunga_kiwi" "eu-west" {
  for_each = local.eu-west.kiwi
  region   = kowabunga_region.eu-west.id
  name     = each.key
  desc     = "${local.eu-west.desc} - ${each.value.desc}"
  agents   = [for agent in try(each.value.agents, []) : kowabunga_agent.eu-west[agent].id]
}

Let’s continue with the 3 Kaktus instances declaration and their associated agents. Note that, this time, instances are associated to the zone itself, not the region.

locals {
  currency           = "EUR"
  cpu_overcommit     = 3
  memory_overcommit  = 2

  eu-west = {
    zones = {
      "eu-west-a" = {
        id = "A"

        agents = {
          "kaktus-eu-west-a-1" = {
            desc = "Kaktus EU-WEST A-1 Agent"
            type = "Kaktus"
          }
          "kaktus-eu-west-a-2" = {
            desc = "Kaktus EU-WEST A-2 Agent"
            type = "Kaktus"
          }
          "kaktus-eu-west-a-3" = {
            desc = "Kaktus EU-WEST A-3 Agent"
            type = "Kaktus"
          }
        }

        kaktuses = {
          "kaktus-eu-west-a-1" = {
            desc        = "Kaktus EU-WEST A-1",
            cpu_cost    = 500
            memory_cost = 200
            agents      = ["kaktus-eu-west-a-1"]
          }
          "kaktus-eu-west-a-2" = {
            desc        = "Kaktus EU-WEST A-2",
            cpu_cost    = 500
            memory_cost = 200
            agents      = ["kaktus-eu-west-a-2"]
          }
          "kaktus-eu-west-a-3" = {
            desc        = "Kaktus A-3",
            cpu_cost    = 500
            memory_cost = 200
            agents      = ["kaktus-eu-west-a-3"]
          }
        }
      }
    }
  }
}

resource "kowabunga_agent" "eu-west-a" {
  for_each = merge(local.eu-west.zones.eu-west-a.agents)
  name     = each.key
  desc     = "${local.eu-west.desc} - ${each.value.desc}"
  type     = each.value.type
}

resource "kowabunga_kaktus" "eu-west-a" {
  for_each          = local.eu-west.zones.eu-west-a.kaktuses
  zone              = kowabunga_zone.eu-west["eu-west-a"].id
  name              = each.key
  desc              = "${local.eu-west.desc} - ${each.value.desc}"
  cpu_price         = each.value.cpu_cost
  memory_price      = each.value.memory_cost
  currency          = local.currency
  cpu_overcommit    = try(each.value.cpu_overcommit, local.cpu_overcommit)
  memory_overcommit = try(each.value.memory_overcommit, local.memory_overcommit)
  agents            = [for agent in try(each.value.agents, []) : kowabunga_agent.eu-west-a[agent].id]
}

And again, apply:

$ kobra tf apply

That done, Kiwi and Kaktus instances have been registered, but more essentially, their associated agents. For each newly created agent, you should have received an email (check the admin one you previously set in Kahuna’s configuration). Keep track of these emails, they contain one-time credentials about the agent identifier and it’s associated API key.

This is the super secret thing that will allow them further to establish secure connection to Kahuna orchestrator. We’re soon going to declare these credentials in Ansible’s secrets so Kiwi and Kaktus instances can be provisioned accordingly.

Let’s continue and provision our region’s Kiwi instances !

7 - Provisioning Kiwi

Let’s provision our Kiwi instances